
Monday, October 31, 2016
Friday, October 28, 2016
Here's to the Weekend
While staging the layout for this weekend, snapped a great photo of the M-PHBA-27 between Gerhard and Grays Lake.


Monday, October 24, 2016
Late October Update
There has been a flurry of activity on the layout with the approaching DFW Interchange this weekend. Let's take a quick look at the projects that will be enjoyed by the operators.

 My base is plaster coal loads, the ones that need some work to look like a load.
 We will use Modelmaster Light Earth and a Rustoleum almond colors to paint the loads.
 Generous base coat of Almond
 Dusting of Light Earth

Overcoat dusting of Almond to tone it down. I then allow these to dry overnight in a well ventilated area. The porous loads soak up the paint quickly.

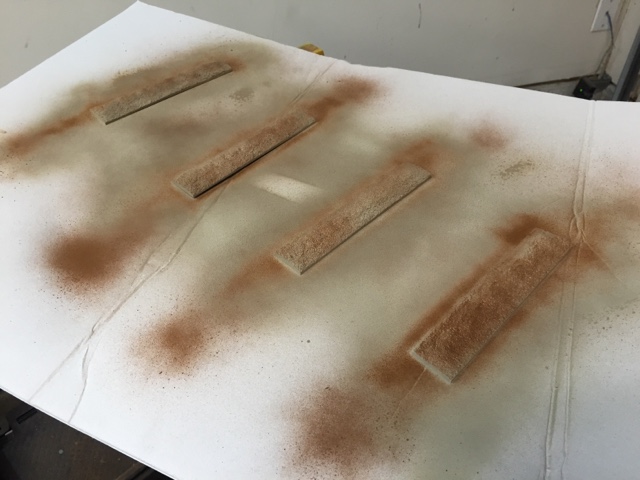
With the loads dry I then apply a generous coating of white glue then followed by sprinkling of Fenugreek seeds. Use a pan so you can collect the extra seeds not used. I also set the loads on foam or cork risers to keep them off the pan while being worked on. After an hour of letting the glue setup I then drizzle scenic cement over the loads to secure any loose seeds on top. Let dry overnight, it is ok if the beers are piled high as they would be in the prototype short haul move.
 Loads drying post scenic cement
 Finished loads dry ready for ops

Finished load ready for delivery to the processing plant. The loads are removable for load / empty flipping between sessions. Later on I will add a light coat of an India ink wash to highlight details and give them a dirtier look. Overall the effect works for me and is a pretty cool loads right behind the power on the M-PHBA manifest.
 Old configuration, no run around meant the R-GEGL "Grays Local" would have to use the main and passing siding to make a run around to serve the industries since two are facing point and one is trailing point moving east to west.

The best part of using track nails is ability to change without ripping up track. I wanted to keep the track footprint very similar to what I had used before, just differnt layout.


 3M track, Grays Spur, Run-around, and mainline
 Industrial spur lead relocated to the right to clear westbound ABS signal.
 R-GEGL-24 with GP38-2 (3833 and 3827) returning from Kincaid, Michigan. Kincaid is not modeled but is represented by fiddle storage in east staging where I will or remove / add cars for this station. The local runs east to Kincaid on Monday, Wednesday, and Friday.
SUGAR BEET LOADS
With progress on the sugar beet plant at Upper Huron, I realized an important LOC (layout operations characteristic) would be modeling the sugar beet campaign and the traffic that comes with it. In building the layout I captured an important LDE (layout design element) with the processing plant. The beet season known as a "Campaign" starts in mid-late August which is the timeframe I model. Like the Huron & Eastern Railway which hauls beets from the thumb to Bay City in large cubic hoppers, the MCIS was going to do the same thing but selectively compressed.
Using the existing fleet of MCTR/MCIs marked bethlehem 3 bay hopers, a portion were removed from Illinois Basin coal service and cleaned. The plant will still burn coal for sometime but will lease RDL 5 door type hoppers which are readily available. The HESR prototype uses large former coke / woodchip GMO cars but we are going to compress with a 3 bay hopper. Saves track space but gives us the feel of beet hauling.
Back to our beet loads, let take a look at how I created them quite easily in just two days.
GRAYS INDUSTRIAL SPUR
One side effect of installing signals at the west end of Grays Lake was realizing the signal mast fouled the Grays Industrial Spur lead. In short order I decided to use Sunday night to refurbish the spur. While no customer locations or tracks changed, I did a two run around with engine escape track allowing the R-GEGL room to work without inferring with the mainline. Truthfully I was not very happy with the track layout and knew there was a better setup.
Track reinstalled, Cooperative Elevator to our left, Crop Production Services to our right, and runaround with escape track in the middle.
Looking west at same industries above. Adding the run around track gives the local a lot more flexibility
We can expect to see a single 3800 series EMD GP38-2 assigned on the R-GEGL out of here.
SIGNAL PROGRESS
We are around 80% complete with the ABS signal project. While I will save more detailed discussion of the last install phase, I did want to give you a sneak peak of the kitbashed signal bridge installed on the East end of GRAY/GRAY SDG DTC block in Gerhard.
In November we will wrap up the signal install project, recap the DFW Interchange Ops weekend, and look at some new projects on The Clair.
Have a Safe and Happy Halloween!
GM
Tuesday, October 18, 2016
St. Clair Sub Signal Install - Part 5 (Phase 4 - Advanced Interlocking)
October is here and with it brings our next phase of the St. Clair Sub ABS signal system install. This post we will walk through Advanced Interlocking at the Grays Lake West Siding Switch (WSS). Using the concepts we have learned through our previous posts we will connect three signals with the TS2 circuit and a Blue Point Turnout DPDT switch.
Readers: The signals and signal systems that I will be reviewing and installing in my Layout How To series were provided at no cost by Azatrax LLC. However the selection, installation, operation, and opinion of these signals and systems are 100% my own.


SIGNAL INSTALLS


Readers: The signals and signal systems that I will be reviewing and installing in my Layout How To series were provided at no cost by Azatrax LLC. However the selection, installation, operation, and opinion of these signals and systems are 100% my own.

Eastbound signal at West Siding Switch (WSS) Grays Lake installed
Kicking off this phase like we have with all in the past, it is important to first read the directions, lay out your materials, and have all of your tools. This install requires the same tools from Part 4 - Phase 3 which has been consistent since our first block. Following Azatrax's instructions both of the sensors for the dual head signal need to be located prior to the switch.
SENSOR INSTALL

Courtesy Azatrax LLC.

Marking the location where sensors will be mounted prior to drilling holes

Looking up from lower deck - holes for signal and TS2 sensors.

Installing IR LEDs first between the concrete ties

Installing IR Receivers next through tracks. Note the angle of the receivers and LEDs is key
The end of the LEDs and Receivers can be gently bent a little to get the correct angle.

IR sensors installed (location noted by fingers) ready to connect to TS2 and test

Wires from sensors fed through foam board.
Until the final connections are complete I use blue painters tape to hold the wires in place keeping all the wires neat and organized.

Wires connected to TS2 - testing with multiple types of cars and locomotives.
Before moving beyond this step - ensure the sensors detect properly. Refer to Azatrax directions for troubleshooting, adjust sensors as necessary, test until it is right.
SIGNAL INSTALLS
Once your sensors install is complete and operating properly, we can turn our attention to adding signal to the TS2. For this block we will install a dual head BLMA (right hand) signal and two BLMA block signals (one right hand and one left hand).

Signals pre-wired and staged at Bay Yard ready to install
Wiring signals before installing on the layout helps tremendously with time savings and frustration factor. I used 22 ga. wire for the signals in this project and probably could have gone a tad smaller but this size seemed very durable.

Threading the wires through the foam board. Use painters tape to band the different signal heads together prior to install.

Instead of trying to take pictures of connecting the wires I figured it was best to provide step by step guides on how to connect all three signals and make them operate as planned.
Step 1 l is identical to how we have installed signals on all of the previous blocks with a east and west signal.

Sensors, Eastbound, and Westbound signals connected to TS2 board.

Step 2 we dive into the advanced interlocking. By connecting signals #2 and lower head of signal #1 to the DPDT we are able to drive the signal aspect to either be red or green depending on how we have thrown the switch which drives the Blue Point turnout controller. The DPDT could easily be a Tortoise type machine.

View of Blue Point Turnout Controller with wires soldered to connections below.

Step 3 uses the concepts from basic interlocking in our last post using the 1000 ohm resistor to cause the TS2 to sense a detection. This happens when the switch is thrown the DPDT routes the power from #6 to #4 where resistor causing a detection. Once these connections are complete spend some time operating the signals and running trains through them before connecting with TS2 #5 at Upper Huron.

Using switch knob on fascia to move throw switch and test DPDT / signal operation

View of TS2 connections between TS2 #5 and TS2 #6. Using plastic clips to hold TS2 power cables and (LE to LW) and (C to C) wires.

Overall view of West Siding Switch at Grays Lake
WEST SIDING SWITCH OPERATIONS
The following diagram below describes signal operations at the west siding switch using the TS2 and DPDT switch. It is important to remember that this is not a CTC control point, the signals do not convey authority to enter main track.
- Upper head of eastbound and westbound mainline signals are ABS intermediate signals
These signals indicate block occupancy only or if switch is thrown against mainline
- Lower head of eastbound and westbound signal siding signal display switch position only
Red - signal lined normal for mainline
Green - signal lined reverse for siding
Direct Traffic Control blocks issued via dispatcher provide authority to enter to operate over main track.


Proceed indication with next two blocks clear / Switch lined normal

Approach indication with next block at Gerhard occupied / Switch lined normal

Stop indication due to caboose just traversing into block / Switch lined normal

Switch thrown against mainline within in block / Switch lined reverse to siding

Westbound signals - Left signal for siding (switch indication) / Right signal indicating block occupancy
With the westbound siding switch and signals operating, I am now wiring up the eastbound siding switch and signals. These signals will operate via TS2 Circuit #7 prior to the mainline going into east staging. Beyond the detection circuit at the east switch one more TS2 #8 will be installed just ahead of the east staging yard throat. This final circuit will provide proper advanced block occupancy indications whether operating east or west.
I hope you have enjoyed this install post. For me it did stretch my wiring abilities where I learned how to tackle more complex wiring. Breaking it down into smaller steps really helped bring it all together. While it is not a CTC control point, the ability for the TS2 to drive four signal heads at a siding can allow you to have an effective signal system with ABS as the basis. With our DFW Interchange session coming up next weekend, the system will add another layer or railroading for the operators. Please feel to ask questions about the install, one of my goals with this series is showing that you can add this type of setup to your railroad.
GM
Friday, October 14, 2016
Happy Friday
I hope everyone has a great weekend whether you have to work or have time off to relax, enjoy family, and model railroad.

Alot of work ongoing for the next signal install update coming next week. In the mean time here is a sneak peak of the ongoing work at Grays Lake. Enjoy!
Wednesday, October 12, 2016

Wednesday, October 5, 2016
Early October Update
First off, I truly appreciate everyone who reads my blog. Your viewership and support is why this blog is here and continues to grow. Lately we have discussed a lot about sensor / signal installation. This project has been a lot of fun and has really built my confidence in this type of work, by the end of the month we will wrap it up. It is important while working on the signal project to continue showcasing other work happening on the layout, trust me there has been plenty of other St. Clair Sub on-goings so lets take a look.


Tichy makes a great kit for adding walkway or handrails to a bridge pretty easy. It took three kits or six walkway panels to complete one side. Once they were glued to the outside of the bridge track I let it dry 24 hours. The next day I used a fine 3M sanding block to smooth the side of walkway for the handrail install. After sanding complete the handrails were install just as easy as the walkway went on. For the bridge structure rehab i used Tenax 7R, while the handrail install was best suited with Loctite Super Glue and a toothpick for application.


FLEET ADDITIONS / RE-MARK
This past week I picked up two American Limited Models Trinity 3281 covered hoppers. These models are fantastic, and even better when you get them 50% off!
These cars will be re-marked for NRLX under lease to Graystone Cement. We will dive into the backstory and other proto-freelance railroad connections in a future post.


Beautiful paint job - unfortunately the logo and marks gotta go

Logo gone - gotta clean up the smudge, didnt expect this... oops

Using the polymer eraser the smudge cleared up quite nicely

Car complete - ready for Graystone Cement logo and NRLX marks
This was my first time using this method, so not exactly perfect. To clean up the smudge I used a Polymer eraser which made quick work and cleaned the car of quite well.


Assembly line accomplished
Tools for this how-to (Microsol, Cotton Swabs, Polymer eraser, and time 5-6 minutes). After dabbing the Microsol onto the bath tissue with the swab on the lettering you want to remove it just takes time. After 5-6 minutes using the swab you can remove the lettering. Clean up with the eraser (gently).

Practice makes perfect - 45 minutes later 5 cars were ready for new marks
Thanks to Shannon Crabtree for the tips on doing this successfully.
BRIDGE REHAB
While the signal gangs are working from Upper Huron to Grays Lake, the engineering department took the opportunity to rehab the Quincassee Creek Bridge.
What bridge?
I built this Walthers Single Track Through Truss Bridge kit back in the fall of 2007. After a few moves and being on its third MCIS layout it was in need of work.
After around an hour all of the loose parts had been resecured and it once again looked like a solid bridge. But to takes things one step further, I decided to add a walkway and handrail the length of the bridge track.
Tichy makes a great kit for adding walkway or handrails to a bridge pretty easy. It took three kits or six walkway panels to complete one side. Once they were glued to the outside of the bridge track I let it dry 24 hours. The next day I used a fine 3M sanding block to smooth the side of walkway for the handrail install. After sanding complete the handrails were install just as easy as the walkway went on. For the bridge structure rehab i used Tenax 7R, while the handrail install was best suited with Loctite Super Glue and a toothpick for application.
Finished bridge - side view

Finished bridge - back on layout
As you can see from the pictures a simple $2.50 detail kit added a lot to this well done structure. Overall a $8.00 add.
SIGNAL BRIDGE MODIFICATION
Moving at full speed on Part 5 (Phase 4) of my signal install series, I have been getting all of the signals tested and pre-wired.
On the east end of Grays Siding the track layout dictated I mount the signal for the passing siding to mainline overhead. There is a prototype for everything they say and a double track modern single head signal is no exception.

Photo of prototype at New Iberia, LA. on BNSF Railway. (Courtesy & Copyright: Donovan Reed)
This signal modern bridge for the siding is fairly new. This territory is ABS with the siding having a spring switch from siding to main. Both signals on the bridge display the same aspect, remembering that ABS signals only show block occupancy not authority.
My basis for the project was the right handed or left handed BLMA overhead signal bridge.

My basis for the project was the right handed or left handed BLMA overhead signal bridge.

- First thing to do is unravel the ends of the four wire sets and test to see which are associated with which signal head before making any modifications.
- Test signals and mark wire sets (I use the Logic Rail Tech signal test - very helpful)

- Test signals and mark wire sets (I use the Logic Rail Tech signal test - very helpful)

- Once wires are marked proceed to cut the magnet wire that is for the upper signals which will be discarded.
- Cut off the upper signals along with handail.
- Smooth with a file the cut locations and with that you have a overhead signal bridge for signal territory.


- Cut off the upper signals along with handail.
- Smooth with a file the cut locations and with that you have a overhead signal bridge for signal territory.

Finished product turned out exactly as expected - will look great protecting at East Grays.
LAYOUT DIAGRAMS
My layout has hosted no less than 8 operating sessions in the past two years. Always looking to improve I took at hard look at the station diagrams and wondered how I could improve. Simplification was the answer.

Diagram for Grays Lake Industries above and mainline / siding below
For each station I have begun making the diagrams smaller with one focusing on the mainline through the station and another diagram for industries either located adjacent to the main or on a spur.

Old meet new - same information but easier to read and less "intense"
The goal is a road crew operating through Grays Lake is focused on the main so the mainline diagram focuses on items they need to see, while the local would use the mainline diagram but then focus attention to the industry spur diagram. In addition to these new diagrams a small card is provided on the fascia for each industry outlining the work, commodities, and special instructions.

Industry cards for Cooperative Elevator and 3M at Grays Lake, Michigan
SUGAR BEET PLANT PLANNING
One key layout design element is selectively modeling the modern Michigan sugar beet industry in the form of a Sugar Beet Processing Plant at Upper Huron. This industry with its numerous inbound and outbound commodities has been intimidating to capture, and quite frankly over the last year has stalled any trackwork that could used in an ops session. Working with Dean Ferris over the last week we regrouped and outlined the industry focus, givens / druthers, and adapted a plan that captures the feel in the space and allows for a great deal of operating potential on the L-BAPB (Port Belle Turn) during a session. Here is a photo of the industry layout as of this evening.

Michigan Sugar @ Upper Huron will keep an operator busy for a good 1/2 the session

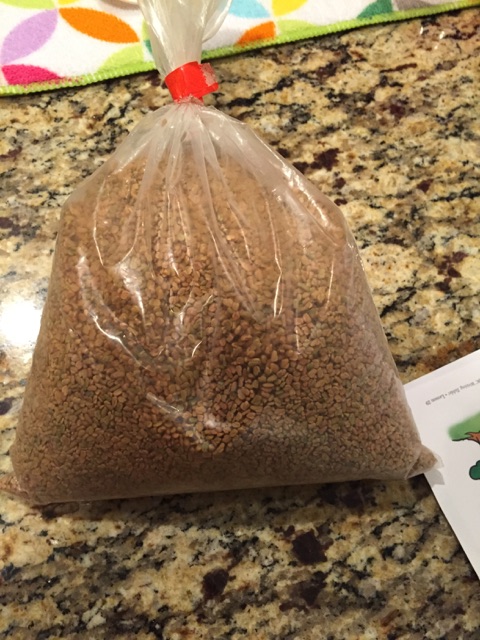
Nothing like 2 pounds of Fenugreek seed to help inspire as well. I see a future how-to hopper load post in this fall.
I hope these few photos provide inspiration in case you are having a hard time with an industry setup. My suggestion; engage a friend and let them give a fresh perspective, it is amazing what you can accomplish with a little teamwork.
October has just begun and the past few days have seen alot of activity. Be sure to check back soon for my next signal install post.
Have a safe October,
GM
Subscribe to:
Comments (Atom)