
Wednesday, March 30, 2016
Friday, March 25, 2016
Y-BA07-25 Special Switch
During some holidays local jobs are annulled during weekdays. Part of this is observance of the holiday such as Good Friday or customer closures.
 Power for Y-BA07-21 is EMD GP38-2 "3830". This motor carries the 30th scheme for the railroad.
 Better shot of entire motor at DSF
 It never fails the car needed for the switch was buried around 10 cars deep. After an hour of switching the car is on its way down the east yard lead. Conductor Dan is riding point protecting the shove.
 After shoving clear of the mainline switch and toning up the DTMF power switches to align over to Bay Main 2, we see the job pulling alongside Lakes Forest Products.
 Aligning the switch into LFP the job comes to a stop to allow the conductor Dan to remove the derail (red tack) into the customer.
 The all door boxcar on spot is empty so the job will go ahead and pull the empty then spot the load.
 The job continues it work setting the empty all door boxcar on the Essexville Branch, then returning to spot the load.
 Load spotted - conductor ratchets down the brake wheel on the boxcar before unloading can begin.
 Work complete the job stops short of picking up the empty to reset the detail.
In this case the normal Bay City Local (Y-BA04-XX) was not scheduled to work today. However Lakes Forest Products requested a special switch in order to receive a boxcar of lumber needed for a a large project starting next week. I happened to snap photos of the switch, so follow along as we watch the Y-BA07-21 extra switch complete its work. Why BA07 versus 04? The 07 denotes it as a special switch versus regularly scheduled.
Customer work complete the Y-BA07-25 returns to Bay Yard with one empty in tow which will be left on yard 6 for the yard job to classify for outbound departure on Sunday evening.
Have a great Easter Weekend!
GM
Wednesday, March 23, 2016

Thursday, March 17, 2016
Mid March Update
Seems like just yesterday we were discussing February updates, but here we are already Mid-March.


 Standard locomotive paint work order
 Numberboards no more on repaints

Reference photos of standard scheme
 Decals for 3825 project

 Before gluing down the pipe cleaners
 Soybean field installed
 View with corn and soybeans in scene. The blend between backdrop and foreground has worked very well.
This post we are going to touch on a newly arrived repaint, process for getting MCIS equipment to the paint booth, new layout lighting, and progress on the farmland scene.
NEW PAINT JOB SMELL
We took delivery today of the newest repaint for the Michigan Interstate. GP38-2 #3825 returned from FRS repainted from its former weather beaten Family Lines patch job to a beautiful scheme honoring my wife's alma mater.
This project used Trucolor ACL Purple and Alaska RR Yellow. The results are fantastic to the point mechanical will evaluate making a paint vendor switch from Scalecoat. Over the next few weeks the Mt. Pleasant shops will be setting up the unit for service including glass re-install, details, and Soundtraxx EMD 645 non-turbo sound. With 3825 back on property this brings the modelled GP38-2 fleet up to 8 (25 total on roster).
GETTING TO THE PAINT BOOTH
The process for painting Michigan Interstate equipment is a very detailed process just like on the prototype whether painted at manufacturer, home, or contract shops.
PLANNING & INSTRUCTION
First thing is first, gotta have a plan. Using drawing templates from photos I layout decal placement for the locomotive whether it is the standard MCIS scheme or something more custom like 3825.
Once outlined in the diagram I then transfer the work to be done to a work order for one of the vendors that will be doing the work.
Considering that someone over 1000 miles away will be doing this work every detail and instruction is covered down to warning decals placment, painting the fuel caps, and doing body work like removing the rear numberboards..
Reference photos of the intended scheme are also provided.
MATERIALS
Along with the diagram and work order I bring together all decals needed to complete work.
Paints are ordered from vendors and shipped directly to the individual painting to keep for future work and the fact they are hazardous shipping commodities.
DIS-ASSEMBLE & SHIP
Last item before shipping is the disassembly of most details, windows, and lights. Since I am adding sound to this motor I removed the internal weight to cut down and prep while unit was in paint shop. Once it returns we can reinstall parts and begin the sound install immediately.
LAYOUT LIGHTING
Installed a new Hampton Bay 48 inch fan that has a 4 medium bulb light kit. Paired with bright white LED bulbs and undermount lighting the room is now very vibrant. The color real helps bring out the layout colors.
FARM FIELD SCENE
After getting good results with the test soybean fields, I pushed forward to complete the soybean rows for permanent installation.
Wednesday, March 16, 2016

Wednesday, March 9, 2016

Monday, March 7, 2016
Early March Update
For the past two weeks the sole focus on the St. Clair Sub has been on scenery for the field scenes between Grays Lake and Gerhard. We are going to look further in depth of this work and where it will take us.
 Corn and soybean fields along the St. Clair Sub.
 Looking west towards M-53 overpass
 Head on view of M-53 overpass

 Foreground scenery will consist of low bushes and grasses.
 Test field sitting in place. You can see the pipe cleaners to the right are not covered in leaf flake while the left side of test is coated in leaf flake.
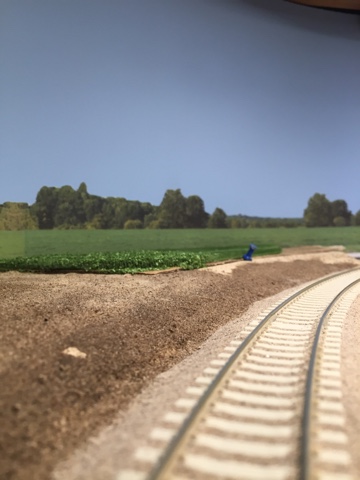 Track level view of scene viewed east.
 Another track level view from opposite direction. The permanent scene will better blend with backdrop at correct angle.
My last post provided an overview of work on going to add terrain where the corn fields were being installed. In addition to the corn fields, soybeans fields and a highway overpass needed to be added before beginning the wet to wet scenery method.
Overpass Scene (left of cornfield)
Helping to break up the scenes between Grays Lake and Gerhard the use of highway overpass and approach creates a simple and effective scene break. To the right of the highway will be a Treeline to corn field transition while to the left will begin the town of Grays Lake with the 3M plant.
The approach hill for the overpass was constructed of 8 blocks of florist foam hot glued into the rough cubic shape and then contoured using Surform tools rasp and planer. Floral foam is very easy to work with but will require a good vaccum to clean up afterwords.
Between work windows M-BAPH-04 passes through the field scene.
Once the terrain was shaped it was installed on the layout and given a coat of tan latex paint. To blend the terrain elevations I mixed sculptamold with the same latex paint and applied by hand. Be sure to wear gloves since the sculptamold will be paint essentially. After it dried the entire scene was coated in scenic cement and covered in my "base dirt". From the photo below I still need to add more base dirt up the embankment.
In addition to the background scenery work, land elevation was added to the foreground along the "local"siding. There will be an access road located on this side of right of way.
Soybean Field (right of corn field)
A few posts ago i previewed a test of concept for creating soybean fields from pipe cleaners and Noch leaf flake. Happy with results, I decided to plant a test field and scale up the test before going full bore.
The results from this scaled up test look great so this week the final field will be installed. Creating the field was quite easy:
- wax paper (trace out field shape)
- Cardboard base in shape of field
- Glue gun
- Pipe Cleaners (color depends on season)
- Noch leaf flake
- White glue or Super 77 spray
Starting with wax paper to trace out the field size I then cut out this template and trace the edges to cardboard.
Once the cardboard is cut out, you can begin hot gluing down the pipe cleaners into the shape of the field. For prototype spacing and contours check out Google earth images.
After gluing of pipe cleaners complete, it is then time to either coat the cleaners in a mildly diluted white glue or spray with Super 77. add the leaf flake making sure to get the sides and top completely covered. Once dry shake off any extra loose flakes and then glue field down on layout.
After being mounted on layout dirt and other scenic materials can be used to blend field into scene. Provided are a few photos of the finished test.
While not a ton of updates to talk about, this scene is taking shape very nicely. It is important to stay on task and no skip around, but once all the base dirt layers are in we will begin to see much more scenic layers to be added.
GM
Wednesday, March 2, 2016

Subscribe to:
Comments (Atom)