Showing posts with label Lighting. Show all posts

Saturday, December 27, 2025

Creating Holiday Magic

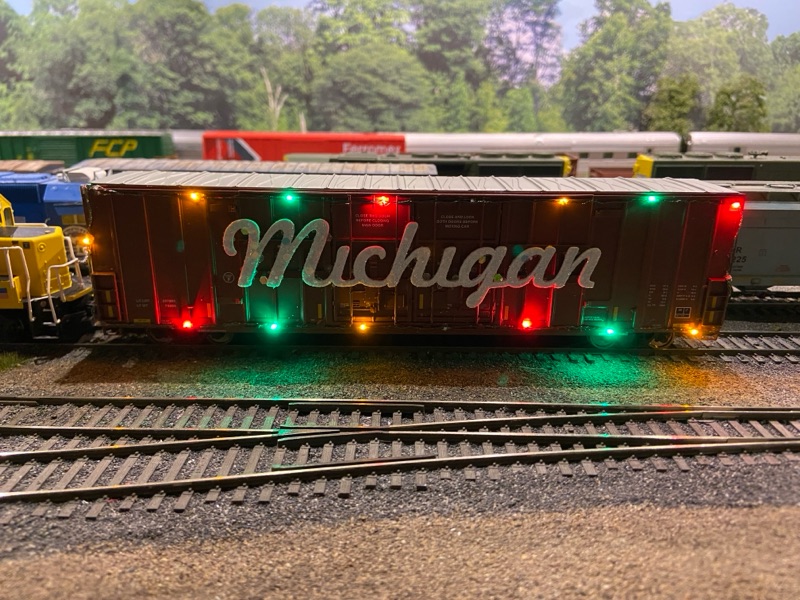
Many of you have asked how I brought my MCIS Holiday Train to life, so we are going to spend this blog post doing exactly that! Quite a bit of content to cover which would not have done the process justice if just posting on Facebook.

MATERIAL & DESIGN

Matt Welke got the idea in my head while he was making those CPKC Holiday Train decals. Look no further than the prototype for inspiration in the form of 60’ Plate F boxcars. The specific boxcars used by CP are not made and that’s ok as the car type was really just inspiration.
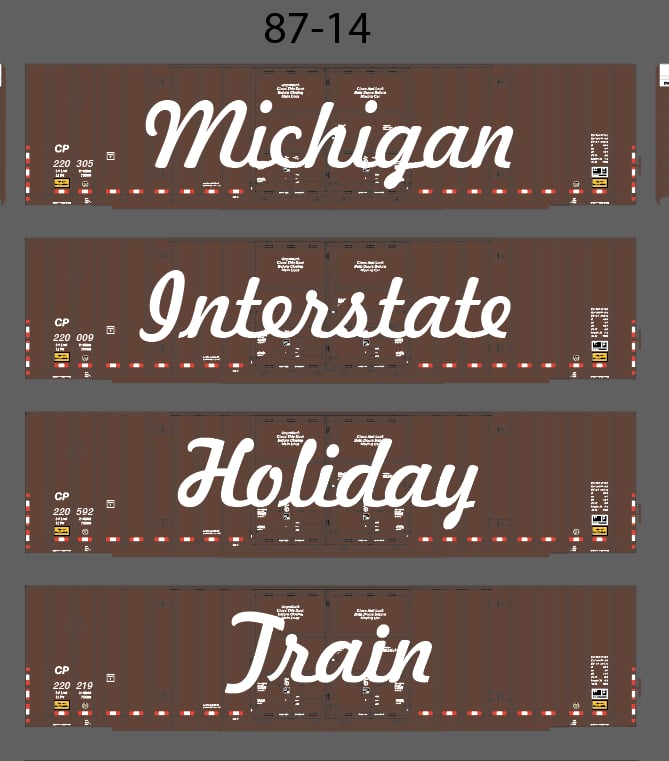
What was available were Walthers Mainline 60’ double door boxcars with the GTW/CN version very sparse marked (Only reporting marks). Made an order for (4) from the good folks at Midwest Model Railroad and they arrived before I knew it.

Alongside the railcars, I need the actual signage which was cut by Circus City Decals from very thin styrene. Topping off the material and design was the 26 led flashing kit from Evan’s Designs.
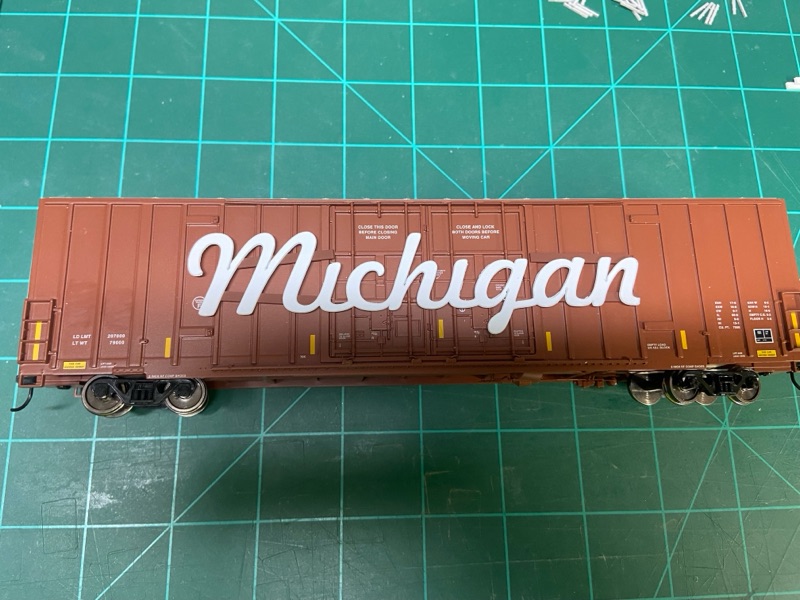
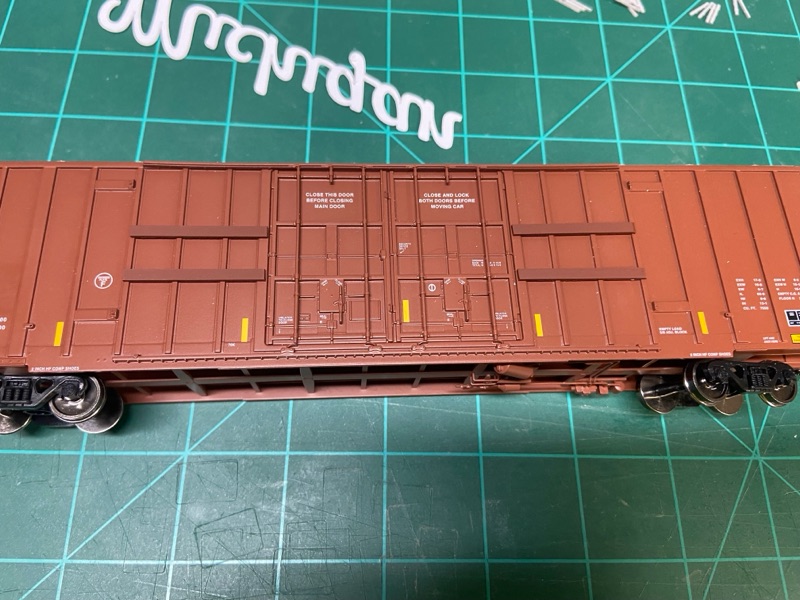
With railcar and signage on hand I mocked up the layout using the artwork Matt provided. The goal was not to heavily modify the cars but keep it since I had to add lighting still. Getting the lettering even with the door rods was accomplished with (4) styrene strips that I cut, painted, and installed.
Material Listing

(4) Walthers Mainline 60' Double Door Boxcars

(4) Evans Designs - 26 nano LED flashing multi-color light kit / 3V 

    Mini Colored String Lights | Shop for Mini Multi-Colored Lights

(1) Styrene to level out signage

(1) Set of custom cut signage from Circus City Decals + Decals for new reporting marks 

(1) CA glue + Accelerator

(1) Spray Adhesive

(1) Paints to match / your choice 

(1) Glitter of your choice 

(12) AAA batteries 

INSTALLATION

Before I spent a bit of money ($35 per light kit x 4 railcars) I figured it would be wise to complete installation on MCIS7401 "MICHIGAN". If everything worked out well on this car, it would just be a matter of applying to the rest of the boxcars. Since I am writing this blog post, we can rest assured that it all worked out just fine. Please mind the photos I forgot to take them during the first railcar so what you will see if the concept that applied to all installations. 


Install Item 1 (Styrene Support) - Depending on the length of the signage determined the length of the styrene strips that were used to level out everything. What I did ensure no matter the length was the strips spanned from the door frame out either the first, second, or third rib providing a solid support. These were painted to match the railcar before installation. 

Install Item 2 (Paint / Glitter the Signage) - Just like it sounds each sign after removing from cutout had a bit of clean up sanding, then got a white base coat and after this dried were sprayed with Elmers adhesive and covered in a snowflake glitter. This glitter helps reflect the light from the leds around the car. 

Install Items 3 (Install the new decals) - which for these cars were just reporting marks and numbers

Install Item 4 (Conduit clearance) - while the battery, switch, and controller are located inside the boxcar, I needed a way to get the wire to the outside. On each car in the upper left corner I notched out a very small portion of the eave where the wire threads through to begin the lighting around the carbody. 

Install Item 5 (Railcar Signage) - I went ahead and installed all of the interior signage with the LEDs being added last around the perimeter. 


Install Item 6 (LED Install) - With the interior items and conduit path made I installed the LEDs from the upper left corner (clockwise) around the car. For this I use gel type CA applied using a toothpick and CA accelerator to quickly lock in the LED before moving to the next one. The LED kit I used operates independent of track power, be sure to test out before install to ensure everything is working properly. 


Take your time working around the car, but once you do the first car and figure out where to best install the lights and wiring the next cars will go quicker. Given its a 26 light string on this car you will find extras left over. I use the conduit patch and tuck the rest inside the railcar which is then secure with kapton tape out of the way. 

After installing all of the lights come the fun part of testing and operating your railcars. I will share how the train was operated along with its train consist in the next post. 

Until then happy modeling! 

GM


Sunday, April 2, 2017

Early April Update

My attempt to complete a post at the end of March was a complete bust. However the on-going work on the layout provides no shortage of great content for me to share with you in this post. Great happenings on the Michigan Interstate St. Clair Sub, so lets get started. 

Executive Unit Acqusition
Over the past few months I have been thinking of acquiring motors for Executive / Special service on the Michigan Interstate. Using prototypes of Pan Am, NS, and Maine Eastern I figured EMD F7s would be a solid choice. 

It just happened that a friend to the north had a beautiful EMD F7 A-B-A set looking for a good home. In short order Michigan Interstate's CFO authorized acquisition of the three engines. While 2017 was not planned for fleet growth, the set were too good of a deal to pass by. 

Trio on previous owners pike awaiting final purchase paperwork

In short order the motors routed BNSF-CHGO-NS-FTWAY-MCIS. Beings they were dead in tow like railcars it took some time to get them to "Michigan" with numerous mechanical inspections along the way. Arriving in Fort Wayne the units were delivered on the overnight interchange cut from NS. Once in MCIS inventory they routed via the daily M-FWGR (Manifest - Fort Wayne to Grand Rapids) connecting onto the M-GRBA (Manifest - Grand Rapids to Bay Yard).

A-B-A Trio arriving at Bay Yard behind EMD SD40-2M #4571 and 4059 on M-GRBA-29

 At Bay Yard the units will ride the L-BAMP (Local Turn - Bay City to Mt. Pleasant) to MAC Shops for prep work before heading to Fogelsinger Rail to receive a very classy scheme. The units should be in new paint by end of summer 2017 in time for the Thanksgiving and Christmas specials planned on the network.


GoPro4 Inspection Car
For sometime i have been wanting to capture the St. Clair Sub from the locmotive engineers view, however from a HO scale perspective it has been somewhat limited. The only options for using an iPhone was the iCar from Minutman Scale Models. After talking with them I learned that there would not be one for a iPhone 6 due to the weight imbalance of the phone and if they had built a car it would be outside NMRA clearance specs. Knowing this I turned my attention toward the other  product which was the Laser cut acrylic GoPro4 Camera Stand from Summit USA. For $9.95 it is a really good buy and takes not very long to build. The most expensive part is the $200 GoPro4 "Session" camera.

 
Components for building my inspection car - 60' flatcar, Camera Stand Kit, and GoPro4 Session.

Directions are clearly labeled with good reference photos. The parts are laser cut ready to test fit and final assemble. 

Within an hour I had the kit together using brush one C.A. After a few hours i test fit the camera on the fixture. 

Definitely recommend this camera fixture for anyone with a GoPro4 Session. The deliverable video and photos provide the view from a modern wide cab locomotive window. Additionally if I want a wide view like from the back of a observation car, I can still use the fixture but just turn the camera around and move towards rear of railcar. Over the next month I will be testing the shots and working up video over the St. Clair Sub that I can share on my YouTube channel. 

If you are interested in how the video looks with this fixture please check out the following link.   Summit Customcuts - Camera Fixture Cab Ride


Grays Lake Scenery Progress
Continuing my 2017 focus on one scene at a time, the scene continues to impress me. The entire area now has a good covering of tan latex paint, various shades of rock, and Heki wildgrass tufts. Here are few photos showcasing the work done in March. 

Tools of the trade - multiple homemade dirt / sand grades and Harley & Sons rock ballast 

Basic rock and ground foams installed from highway overpass back to station foundation (Before) 

 Same view with tuftgrass, textured grass, and SuperTrees added. Everything from background to signals is glued.

 Area around Cooperative Elevator and Crop Production Services developing "Character".

MCIS9019 unloading fertilizer materials at C.P.S. Grays Lake.

If you have been following my posts you can really see how this area has come along way. Over the new few months we will continue to bring it all into a finished product.


Woodland Scenics Just Plug System
We are surronded by innovations in our hobby. One topic that really impressed me was the LED lighting system offered by Woodland Scenics. Up till this system came out Walthers and Atlas had some great product on the market, but the simple plug in / modular system was a win for me. While developing the scene, I figured now was teh time to spend the money and add in the lights whether i lit them now or later. 

Currently i have 3 different sets of lights (modern lights at LPG terminal, Wooden lamp posts for trackside / industry area, and ornamental lights for downtown Grays Lake). So far I have only installed the modern lights and temporarily connected them but the results are fantastic. 

:"Just Plug" light hub - transformer connects into this box which then connects to the LED lights 

Lighting demonstration at LPG terminal - the effect is just enough for nightime ops / photos. 

Be sure to check back as i add more lights, i will touch on where the control boxes ultimately get installed. Hardest part of installing these lights was drilling the hole through 2" thick foam. 


MAC Shops Work

Recently completed install on friends Atlas GP38.
Components Installed:
  • Soundtraxx Tsunami2 EMD Diesel
  • Railmaster Hobbies DS1425-8 speaker,
  • Soundtraxx Currentkeeper
  • Monster LED Rotary Beacon
  • 3mm LEDs for lights

Happened to catch a photo of the motor in transit after releasing from MAC Shops. Who doesn't love a good GP38 in ATSF colors? Ironically the leading motor #4571 (former SD45-2) was originally a Santa Fe before becoming a Michigander.

Returning from MAC Shop behind MCIS 4571 on L-BAMP-25 (Local Turn - Bay City to Mt. Pleasant) 

ATSF 3546 back on customers home rails.

Hope you enjoyed the happenings around the St. Clair Sub. Check back later this month for progress on Grays Lake and hopefully a link to cab rides across the subdivision.

GM


Friday, August 7, 2015

Cool & Comfortable Friday

Well it's another scorcher here in Texas, but maybe these pictures representing a comfortable / clear sky day in early summer Mid-Michigan will make you feel a bit of relief. You can almost feel that breeze off Saginaw Bay!

R-GEGL-05 (5 empty / 4 loads) on the main between Gerhard and Grays Lake enroute to switch the later name towns customers.

     Closeup of MCIS EMD GP40-2

Overall view of this corner. The fascia, valiance, and LED lighting really allow for a "cool-comfortable" atmosphere as well in the layout room.

Happy Friday, thanks for stopping in.

GM

Tuesday, August 4, 2015

Bringing Things To Light...

On my last post everyone had the chance to preview some of the upper level lighting and the effect it provided. After much deliberation it was decided to add this LED lighting to the upper level. Over the weekend maintenance forces installed all of lighting and 95% of the Masonite valiance. Enjoy a few pictures of the room. My mid month update will contain more pictures, but until then enjoy these few.

Overall layout view - as you can lower and upper decks now have similar lighting styles. The valiance also gives the upper level a more defined look from the room. Each of the layout decks in this shadowbox form is easy on the eyes for operators or visitors.


            Gerhard - Before

      Gerhard - After with new lighting

GM

Monday, July 27, 2015

Late July Update - Part 1

The layout has been a beehive of activity this past weekend working on Bay Yard and another unexpected but fun project.

Bay Yard Project
Finally all of the track has been painted and cleaned making them ready for ballast and details. The terrain behind the yard has also received its base Michigan sifted dirt base layer.I hope to get ground foams down this week in conjunction with ballast since this scene will need to done front to back. Look for updated pictures in my part 2 post.

Unexpected Project
During the construction of my model railroad the thought of upper level lighting never really dawned on me, since after all I had a ceiling fan light.... Fast forward to now and well the lighting question has resurfaced. My lower level lighting is complete using LED 3000 kelvin soft white light bars. The intended effect on this level was a shadow box style, and the result matched the intention. The upper level however didn't have a top to create the shadowbox effect like the bottom so things felt "off".

Upper level lighting over Grays Lake

Leading up to this weekend were a book of napkin sketches with concepts to try out. After trial and error the first piece of second level lighting/shadowbox fascia was installed.

It is very lightweight since it's only purpose is holding the led light bars and upper fascia paneling. The core of the piece is Lauan plywood cut into the shape needed with 1x2s used as framework which then is screwed into the backdrop. The light bars are the same as the lower deck bringing consistency. Best part of all is each section will be prefabricated then installed allowing for minimal layout disruption. My goal is testing the concept this month and then building the lighting tops for the rest of the second deck by the end of August to have the layout ready for Octobers operating group day.

Enjoy a few more photos of the install:

View of Cooperative Elevator and Grays Lake.
Cooperative Elevator - Grays Lake, MI

Town of Grays Lake, MI

Thanks for stopping by. We have been averaging around 1000 views a month, so everyone's following, quick glances on updates, or bookmarking are greatly appreciated!

GM