Showing posts with label L.H.T.. Show all posts

Friday, March 16, 2018

March Update

Well I cant say this for alot of other places in the country, but here in Texas spring is in full bloom. Alot of folks just wrapped up spring break vacation or will taking it here the next few weeks leading into Easter so lets take a look at happenings around the "Clair". 


M-BACN-12 rolling through East Wye Switch Upper Huron (EWS UPPE)

CASS RIVER SCENE
My February post touched on the ground work that was going into creating the Cass River scene on my upper level. Over the past few week I have been making terrific progress with not only scenery but the actual through truss bridge that spans the river. Lets look closer at the work completed and whats up next to finish the scene. 

- Dirt
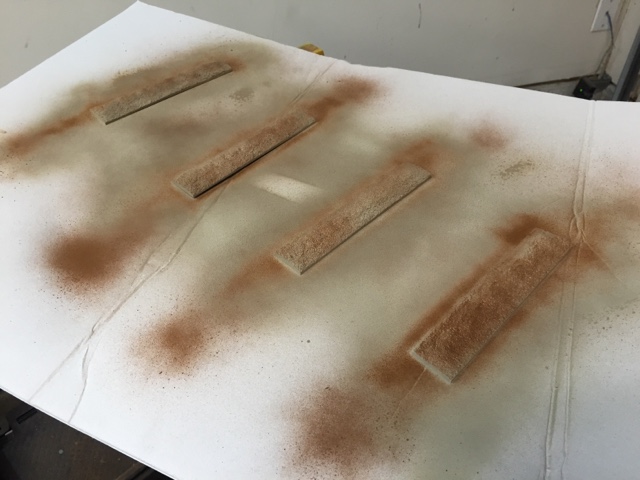
The previous post showed the contour work and base layer of latex paint to kill the blue / pink foam tone. Next comes a layer of true Michigan dirt that I bake and sift to get the right consistency. Having family in Michigan the odd request comes around once a year.... "Yea so can you send me a box of dirt".... They always deliver. I first put down full strength white glue with a paint brush and then using a spoon add the dirt. Giving it 10 to 15 minutes I then come back with a vacuum to remove the excess leaving a nice dirt layer. 

 Getting ready to bake the dirt in a aluminum pan - 350 degrees for 30 minutes


Dirt layer in place, needing to come back with the vacuum

- Greenage
After adding the dirt comes a mixture of foams, flocks, and rocks to give the area life. I use some photo for reference but remembering things in nature, just attempt to go with what looks right. Following the tried and true method, wet with isopropyl alcohol and then soak in scenic cement. I have tried a homemade blend of cement, I love Woodland Scenics preblended stuff the best. Can get it a Hobby Lobby with a 40% coupon for around $6. 


On the river and banks will be a sand mixture mixed with small river rock to blend in 

Layering the scenery really does bring this area to life

- Next Steps
With primary scenery in place and secured I will now be completing the riverbed scene with rocks and sand. Once dry and cured the process to pour Magic Water will take place and finish getting the river complete. I expect to do this at the end of March, so I will be sure to show step by step how that process works and the great results it produces. Prior to pouring the water, the bridge and ballast work will be completed. Wrapping up this area will be alot of Scenic Express Super Trees.... alot..... 


UPPER HURON SCENE
Since I have all of the materials out it only makes sense to keep with the momentum and scenic another adjacent scene to the Cass River which is the Upper Huron scene. 

About the scene: Upper Huron is not a fictional tower on the railroad but also a neat operation element as well. Upper Huron or UH as its know is the location of a operation wye that allows trains to traverse from either direction on the St. Clair Sub onto the Port Belle Sub. The Port Belle Sub is represented by staging however this line hosts the switch to enter the Michigan Sugar plant and sees a daily local turn during the session and occasionally a unit rock train from a quarry. The actual scene depicted hosts a grade crossing leading into town modeled by a Sceniking backdrop, the sugar beet plant, and a modern water tower in the middle of the wye. Anyone familiar with Michigan knows about all of the unique water towers, UH will be no different. 


 Out of flat blue foam, comes terrain shape via pink foam and sculptamold

 View east looking at the sugar beet plant, and east wye switch. You can see where the scenery currently stops. 

Water tower right in the middle of the wye will have character of its own. AEI reader site as well in Upper Huron. 

Still alot of work to do in this area but wow just getting some terrain shape, paint, and dirt down really helps make the area more appealing. 


RAILCAR FLEET ADDITION - GUNDERSON 5188
Earlier this month Michigan Interstate received the first of a larger covered hopper being added to the agriculture fleet. The 5188 cubic hopper is slightly larger than our most modern being the Trinity 5161 cubic and the two will be mixed in together to provide our customers newer high capacity cars to get their grains to market. In preparation for this add the fleet did cascade seeing the venerable ACF 4600 cubic cars retire and find new life on the Delmarva Central out east. 

Fleet Plan (Effective March 2018)
4600 cubic - retired from fleet
4650 cubic - owned by Mich. Ag. Commodities for single or quad-block  
4700 cubic - sugar beet pulp, sugar beet pellet, agricultural single
4750 cubic - agricultural single, agricultural quad-block
5161 cubic - agricultural single, quad-block, and unit
5188 cubic - agricultural unit 


A quad block on their way to their first loading at M.A.C.

Of course in the process of purchasing the cars, MCIS decided to go with the Scaletrains Operator version since lets be honest the details are good enough and I am rough on the equipment. In short order I had the variety pack of FRA 224 reflectors from Smoke Box Graphics and our mechanical forces proceeded to get them compliant.... Not sure how they got from Sahagun, Mexico to Michigan without reflectors.... 

Great job by Scaletrains and Smokebox Graphics for great new innovative products, they hit these right on the mark! 


Looking pretty sharp - MCIS 5827


CASS RIVER BRIDGE 
Following Tom Patterson's step by step from MRH I used gouache paints to weather my through truss bridge. I dont want to take anything away from the article so recommend if you are interested in doing this, take a look at the November 2011 issue and go from there. All of the paints can be purchased at a craft store and one thing I did discuss with Tom is using distilled water over Microsol is just as good and even better. I ended up doing the first overall wash with Microsol, but the random sponge work was done using water. Enjoy the photos.

Base wash of burnt umber-onyx black gouache paint applied

After a few days - proceeded with the random burnt umber and burnt sienna wash

Bridge complete and dry - wow the washes really made it pop

Closeup of the girder and rivet plates - Michigan elements have taken its toll

Simple technique - amazing results.


OREGON JOINT LINE - MARCH DOUBLEHEADER
Wrapping up this post, we are going to have to get slightly smaller... like n scale small and head on over to Dean Ferris' Oregon Joint Line. Recently I had the opportunity to participate in a double header operations session. For the morning session I was the dispatcher and had a good time pushing around fifteen trains across the railroad in preparation for the afternoon shift. Following a lunch break by the pool I crossed over and went into management as the Assistant Superintendent. This role is to help the layout owner (Superintendent) with getting operators orientated and running. Lets be honest from the management side the railroads operating on the OJL are not making any money with idle trains. If you can tell there was some management adversity built into this session all to have a little fun. Right off the bat I was handed a wire describing the need to run a rotary plow extra account snowfall at Snowline! 


I blew up the photo real big so you can see, there is definitely some friction between the unions and management. Believe the operator may have added more letters to my last name then I thought were there. None the less the railroad cannot operate effectively if the summit grade of the line at Snowline is blocked. Myself and engineer M. Thidemann didn't know what we would find until we got up on the summit and "Oh $#!% thats alot of quicker picker upper snow". After a few runs at it we cleared the siding and ran down to Kinzua to turn the extra on the wye and go back at it from the other direction. Upon returning to the summit at Snowline we found the mainline now blocked due to shifted drifts and snow with almost a paper like consistency.

 Making a run at the drift in the siding at Snowline.. Took us three runs to clear

In the end it was about keeping them moving like we see here with a meet at Fossil. 

Having a morning and afternoon session where everyone from both sessions could get together and have lunch was a great idea. So many times having a session limits you to a certain amount of folks not allowing any networking outside of the session, but in this case folks were able to talk shop, eat, and either wrap up or start their operating day on the OJL. Great job to Dean for planning this and having me help with both sessions. 

That in a nutshell is my March update, still have another two weeks left of the month and plan to keep making good progress on the Cass River and Upper Huron scenes so stayed tuned and safe travels to all out on spring break. 

GM 


Monday, October 30, 2017

Modeling Glass Cullet Loads

I think at one point we all come across a prototype freight load that begs to be modeled. In particular I can say there are many that lack a model, but a simple one that has been on my planning board for sometime is recycled glass otherwise known as "cullet". My intended goal will be to share the backstory and creation process so you can bring these loads to your layout. 


What is it? 
In simple enough terms it is crushed recycled glass. This material is used in numerous ways such as fiberglass insulation, glass beads (sandblasting), and road materials to name a few. 


           Potter's Industries north of Brownwood, TX. They make glass ball beads for many different uses. 
                   Photo courtesy of Google Maps. 

How is it transported?
Alot of times glass cullet is crushed and transported locally by truck from the recycling facility to end user, but there are cases where it moves by rail. I do not believe it will be one of those unit train type commodities found often like aggregate or coal, but as a one off load. Every prototype example I have seen or found shows use of dump trucks or open top hoppers, not to say an older covered hopper could be utilized. This is a heavier material as its raw material was sand and soda ash prior to becoming glass, so the car would not be loaded to the brim more around 3/4 full. The cars I have seen are marked EAMX (Everest Railcar Services). Due to the nature of the commodity these are probably in a captive service as cleaning would require something more abrasive then water like sandblasting. 

Besides seeing in person from an overpass, John Danielson over at rrpicturearchives.net has the best photo of these 3 bay hoppers carrying glass cullet at this link: EAMX 328 - John Danielson Collection 

How is is loaded/unloaded?
Loading at the crushing facility is as simple as a front end loader filling its bucket and dumping into the railcar. Unloading is just as easy. In this prototype example a small under track pit allows the transloader to empty from one gate at a time. The pit is shallow but deep enough for a front end loader to get a bucket full, back up, and then load the awaiting truck. The front end loader could also double as a car mover if multiple cars are to be unloaded. 


Photo courtesy Google Maps (Satellite View)
                         Glass cullet rail to truck transload in Brownwood, TX on Texas Rock Crusher Railroad

                                                        Photo courtesy Google Street View 

How is it modeled?
The easiest part about glass cullet is its "replication" on a model level. Sometimes making model loads are complex and require kitbashing or even scratchbuilding. In this case it is about simple cosmetics. Follow along as I walk you through creating a glass cullet load. In as little as a weekend you could have yours complete. 

Step 1: Materials
- Removable type open top hopper load (I used Motrak Models #81728)
       ** Side note the Motrak Models coal load is fantastic as purchased without changes **
- Rustoleum 2x (Gloss White) or any cheap white spray can 
- Dullcote
- Extra fine glitter (I used silver peacock which is blueish-green-silver)
- India Ink / Isopropyl Alcohol mix


Coal type loads work well with the sharp angles to provide a good texture for the paint / glitter to adhere on. 

Step 2: Base 
- Start by giving the drop in loads a generous coat of gloss white (Well ventilated area)
- Spray from all four angles to ensure you get a good coat in all the tight spots


Step 3: Glitter
- Giving the paint just about one minute to setup some then sprinkler your glitter
- Do not worry about being modest you want solid coverage 
- At this point let the load completely dry, do not touch or dump off excess glitter


Step 4: Glitter to Cullet
- Once dry, carefully pickup the load and tip it over to remove excess material.
- You should have good coverage with no load under showing through.
- In a well ventialiated area - spray the load with dull coat and let dry.
- The glitter provides the dull shine that you would find from crushed glass.  


                           This was my test plastic load before making the cullet loads from Motrak load. 

Step 5: Dull 
- Once dullcoat is dry use your fingernail to check around the edges of the load and remove any glitter stuck on the sides. Its important the sides are clear of glitter so it will sit properly in the railcar. 
- Airbrush load with a india ink / alcohol mix to get the desired dirty effect 
- Let dry, then place in railcar.


This technique worked well for plastic and hydrocal casting loads. Materials can be purchased for under $10 at your local craft store. 


I hope you enjoyed this fun post, showing you a quick and inexpensive way to add a one of a kind open top load to your layout. Everyone have a safe and happy Halloween.

GM 


Monday, January 2, 2017

Early January Update

It is amazing at how fast the Holiday Season goes by. Seems like yesterday was Thanksgiving and now are here in 2017! Since my last post the St. Clair Sub has seen different types of activity. One great point of our hobby is variety. For example I do not feeling like working on scenery, so I can instead install a decoder, assemble a building, or just run trains. Lets take a look at happenings from the back end of December.

Christmas Acquisitions

I have to give my family credit, they do a great job staying in tune to what I like. It also helps when online retailers like Walthers and Mountain Subdivision Hobbies have wishlists that you can create and folks then reference. At any rate I was very fortunate to receive great model train gifts for Christmas

 From the wife and kids: Blair Line Fertilizer Supply Kit, 2017 Walthers Catalog, and resale DPM buildings from Ebay. 

From parents and grandparents - 30ga wire, Soundtraxx Tsunami2s, Currentkeepers, and Railmaster 28mm speakers.


Very grateful and blessed for fantastic model train items. If your family or significant other doesn't know what you want and especially if it is model train items, use those wishlists to help them find the right gift. Not to mention an easy way to help them dial into what you model.

Both the DPM buildings and Blair Line Kit will be located in Grays Lake, Michigan. The sound decoder items were installed into Athearn Genesis SD45-2s that have been de-rated into SD40M-2s.


New buildings on the corner of Main and Harrison Streets in downtown Grays Lake. 

CEMENT TERMINAL STORAGE DOME
As I begin to "rough in" the Graystone Cement Terminal at Bay City I wanted to find a way to give the facility a modern expansion look to an existing facility that had been there for some time. Searching Google for Cement storage silos led to alot of different types of facilities. But this one below in Arkansas caught my eye as a great opportunity to model. 


Photo courtesy of Penta Industrial 

Finding my prototype I then setout to find commercially available items to help scratchbuild this storage dome. An quick visit to Hobby Lobby provided discovery of 12" smoothfoam halves. 


 This foam halve should fit the bill nicely. 

Using a bendable straight edge and pencil I traced the center where I would cut the halve. Once traced a sharp foam knife made quick work of the cut. 


 Mocking up the storage dome adjacent to the primary silos of the Graystone Cement terminal.

Planning my next move on the dome will require the top cap of a Kroger Whipped Cream canister, Walthers conveyors, and Pikestuff Walls to build the drive in access noted in the prototype picture. This entire cement terminal should make for a fun scratch-bash. It has been some time since I worked on buildings in detail, looking forward to the work.

In addition to the dome I will be purchasing a Walthers Medusa Cement kit as the base with additional silos added from what I have on hand. A two track load out shed put together from Pikestuff components and a set of those new Alkem Scale Models security fence kits will wrap up the industry nicely. 

MT. PLEASANT "MAC" SHOP UPDATE
Like prototype railroads, the business, mechanical, and regulatiory necessity need requires locomotives to be maintained, rebuilt, upgraded, or retired. In the case of the Michigan Interstate our locomotive and car shop are co-located at Mount Pleasant, Michigan. MAC stands for "Motivepower And Car". Our team there was quite busier than Santa's helpers releasing three locomotives back into service before the end of 2017. 

MCIS 4570 and 4571 (EMD SD45-2) derating to (EMD SD40M-2)

Wanting to align fleet similarity for parts and maintenance the mechanical team took the opportunity to de-rate the only two 20-645 units to 16-645s. Both of the units had issues with their original motors and had been sidelined at Mt. Pleasant. With 16-645 motors installed the locomotives have been re-classified as SD40M-2s. At current time the locomotives we keep their original numbers 4570 and 4571, in the future they will be renumbered into the 4050-4069 series. 

Components Installed
Soundtraxx Tsunami2 PNP EMD Diesel (EMD 645 Turbo)
Soundtraxx Currentkeeper
Railmaster Hobbies 28mm round speaker
Soundtraxx Sunny White 3mm LEDs


3825, 4570, and 4571 in "High Bay" at MAC Shop

MCIS 3825 (EMD GP38-2) Electronic Upgrade
With completion of this motor there are now eight modelled GP38-2s of the total twenty five in the fleet. This unit was painted early in 2016 by Fogelsinger Rail into special paint honoring University of Mary Hardin Baylor. The CEO must know someone who graduated from UMHB... 

Components installed:
Soundtraxx TSU-1000 (EMD 645 non-turbo)
Soundtraxx Currentkeeper
Railmaster Hobbies DS1425-8 speaker
TCS Sunny White SME LEDs 

MKT 175 (EMD GP40) Sound Install
In addition to work for Michigan Interstate and its subsidiaries, MAC shops also does contract work. Earlier in December we installed a TCS Wowsound decoder with motherboard discussed in my last post. 

Prior to return customer delivery, locomotive was tested and calibrated in rock train service. This photo could be somewhere in Texas during the "Katy" days.


L.H.T. - Layout How To (Railcar Deck Rebuild & Base Weather)
During a visit to the train store last week I came upon the Laserkit wook deck replacement kits for various railcars. . Selecting kit #325 for Model Die Casting / Athearn RTR 60' Flatcar I knew that the only 60' HTTX flat on my layout could really use this upgrade.

Kit and Athearn RTR HTTX flatcar in need of a better deck...... 

 Chisel blade made quick work of removing the plastic tractor holders. These had been glued on a factory.

Plastic holders removed, use the chisel blade to ensure the clean is clean. 

 Before installing the self adhesive wood deck, I wiped down the plastic deck with alcohol.

Following the kits instructions, use the stake pockets to line up the wood deck and car. Looks great but too new.  

Wash of india ink / alcohol helped tone down the car and deck. 

The india ink wash helped give the car a nice base weathering. Using other techniques I will continue to weather to represent a 30 year old car operating in machinery service out of Midwest factories. This car will allow me to test out the Smokebox Graphics FRA224 reflective stripes. The deck replacement kit from American Model Builders is a great value, simple to install, and helps transform a plastic kit into a flatcar model. 


Quick update for a Quick holiday season. Now that we are in the new year its time to see where we are going in 2017 and where we went in 2016. My next post we will look at the goals I had at the beginning of 2016 and see where I landed in actually completing them. We will also discuss "State Of The Railroad" and how I plan to manage scenery on the layout. 

Thank you for stopping by to read my Early January Update. 

Happy New Year!

GM 


Monday, October 24, 2016

Late October Update

There has been a flurry of activity on the layout with the approaching DFW Interchange this weekend. Let's take a quick look at the projects that will be enjoyed by the operators.

SUGAR BEET LOADS
With progress on the sugar beet plant at Upper Huron, I realized an important LOC (layout operations characteristic) would be modeling the sugar beet campaign and the traffic that comes with it. In building the layout I captured an important LDE (layout design element) with the processing plant. The beet season known as a "Campaign" starts in mid-late August which is the timeframe I model. Like the Huron & Eastern Railway which hauls beets from the thumb to Bay City in large cubic hoppers, the MCIS was going to do the same thing but selectively compressed.


Using the existing fleet of MCTR/MCIs marked bethlehem 3 bay hopers, a portion were removed from Illinois Basin coal service and cleaned. The plant will still burn coal for sometime but will lease RDL 5 door type hoppers which are readily available. The HESR prototype uses large former coke / woodchip GMO cars but we are going to compress with a 3 bay hopper. Saves track space but gives us the feel of beet hauling.

Back to our beet loads, let take a look at how I created them quite easily in just two days.


My base is plaster coal loads, the ones that need some work to look like a load.


We will use Modelmaster Light Earth and a Rustoleum almond colors to paint the loads.


        Generous base coat of Almond 


               Dusting of Light Earth


Overcoat dusting of Almond to tone it down. I then allow these to dry overnight in a well ventilated area. The porous loads soak up the paint quickly.


With the loads dry I then apply a generous coating of white glue then followed by sprinkling of Fenugreek seeds. Use a pan so you can collect the extra seeds not used. I also set the loads on foam or cork risers to keep them off the pan while being worked on. After an hour of letting the glue setup I then drizzle scenic cement over the loads to secure any loose seeds on top. Let dry overnight, it is ok if the beers are piled high as they would be in the prototype short haul move. 


     Loads drying post scenic cement 


    Finished loads dry ready for ops


Finished load ready for delivery to the processing plant. The loads are removable for load / empty flipping between sessions. Later on I will add a light coat of an India ink wash to highlight details and give them a dirtier look. Overall the effect works for me and is a pretty cool loads right behind the power on the M-PHBA manifest.

GRAYS INDUSTRIAL SPUR
One side effect of installing signals at the west end of Grays Lake was realizing the signal mast fouled the Grays Industrial Spur lead. In short order I decided to use Sunday night to refurbish the spur. While no customer locations or tracks changed, I did a two run around with engine escape track allowing the R-GEGL room to work without inferring with the mainline. Truthfully I was not very happy with the track layout and knew there was a better setup.


Old configuration, no run around meant the R-GEGL "Grays Local" would have to use the main and passing siding to make a run around to serve the industries since two are facing point and one is trailing point moving east to west.


The best part of using track nails is ability to change without ripping up track. I wanted to keep the track footprint very similar to what I had used before, just differnt layout.


Track reinstalled, Cooperative Elevator to our left, Crop Production Services to our right, and runaround with escape track in the middle.


Looking west at same industries above. Adding the run around track gives the local a lot more flexibility


3M track, Grays Spur, Run-around, and mainline


Industrial spur lead relocated to the right to clear westbound ABS signal. 

We can expect to see a single 3800 series EMD GP38-2 assigned on the R-GEGL out of here. 

SIGNAL PROGRESS
We are around 80% complete with the ABS signal project. While I will save more detailed discussion of the last install phase, I did want to give you a sneak peak of the kitbashed signal bridge installed on the East end of GRAY/GRAY SDG DTC block in Gerhard.


R-GEGL-24 with GP38-2 (3833 and 3827) returning from Kincaid, Michigan. Kincaid is not modeled but is represented by fiddle storage in east staging where I will or remove / add cars for this station. The local runs east to Kincaid on Monday, Wednesday, and Friday.

In November we will wrap up the signal install project, recap the DFW Interchange Ops weekend, and look at some new projects on The Clair.

Have a Safe and Happy Halloween!

GM