Sunday, June 28, 2015

Layout How To #02 - Sound Decoder Install

The weekend is coming to a close and with it one of my summer projects Idiscussed in my early June update. This project was the sound installation into a pair of Proto 2000 GP38-2s. The work took sometime to complete over a few days, but the time and effort put forth were well worth it.

As in most learned skills it takes practice to get better and this is my fifth Soundtraxx install so I am getting there, as each install is unique in its own way. Lets walk step by step on how I brought these two second generation EMDs to life.

Preparation & Tools
For this How To we will be installing the following in each motor:
  - LED lighting
  - Soundtraxx Tsunami TSU-1000 (EMD 645 non-turbo)
  - Soundtraxx Currentkeeper
  - Railmaster DS1425-8 Speaker

When it comes to the tools list, the Soundtraxx installation guide and their online resources provide a list of needed tools to make the install go smoothly.
  - Soldering Iron / Rosin Core Solder
  - Sharp Hobby Knife
  - Jewelers Screwdriver set
  - Electrical tape (3M)
  - Heat Shrink Tubing
  - Tweezers
  - Silicone Caulk (GE brand that comes with a nozzle - easy to handle)

As you can see from shell removal to make a TSU-1000, Currentkeeper, and speaker fit we are going to need to make cuts to the frame.

Once you have your workspace and parts all setup I then move on to the dis-assembly process.

Frame Dis-assembly & Cutting
Following the manufacturers guidelines I dis-assemble the engine and layout all of the major components. It is also important to mark the wires for the left truck, right truck, (+) motor, (-) motor for decoder connection. For small parts such as light bars, screws, and detail parts I put them in a small Ziploc so they don't "disappear" during the project.

Neat and Orderly is the key.
Part bags, extra weights, wiring diagram for the harness that was not used. It helps me to sketch out my wiring for the LEDs ensuring I dont wire them in backwards...
The TSU-1000 is setup to allow the use of a JST to NMRA 8 pin harness to make installing in DCC ready engines easier. In the case of 3833 the socket that the harness could install into is no good and 3827s socket was tossed in favor of hardwiring a NCE decoder many many years ago. That is ok with plenty of wire to work with coming off the new decoder the hardwire will be a snap.

Marking on the frame where the cuts will be made with a Dremel rotary disc and hacksaw.. This part can become labor intensive and the metal from the cutting will become hot - dont forget PPE - safety glasses, gloves!!!!

From the photo the area to remove was planned for, marked, and removed. Once the cuts were complete, I used a bench grinder to smooth down any rough surfaces on the frame. 

Frame Re-Assembly & Decoder Install
Once frame modifications were complete it was time to re-install back on the locomotive chassis and feed all of the existing wires through their respective channels before beginning the decoder install.


SPEAKER
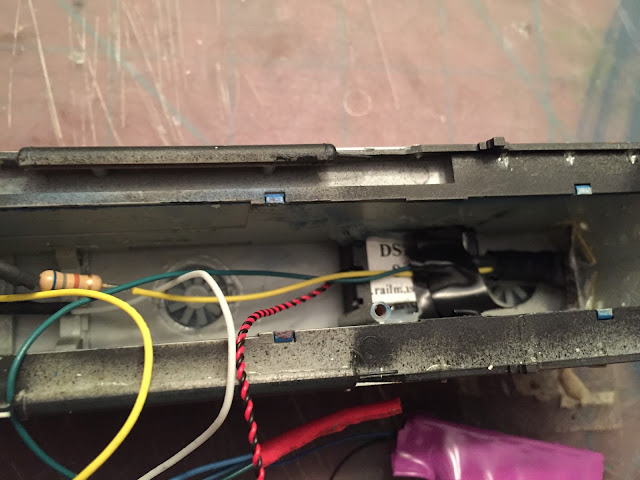
From this point forward I followed the Soundtraxx instructions step by step through the decoder installation process. On these models the radiator fans are open which allows for the perfect spot to get the sound out of the engine. The Railmaster speaker being used (DS1425-8) is setup with its own baffle enclosure so all that was needed to help provide the best sound quality was a good seal between the front side of the enclosure and the open radiator fans. This was accomplished using the GE silicon caulk a day before so keep this in mind when planning your install to seal the speaker in the day before if you go the silicon way.... Remember alot goes a long way. 

Photo above shows the speaker installed with silicon between the front of speaker edges and radiator fan. Additionally I added the silicon on the bottom of the enclosure visible to provide a dampening effect in case the enclosure vibrated against the shell and extra securement. 

LIGHTING
For the LED lighting Soundtraxx Sunny White LEDs were utilized in conjunction with the light bar that is used with the proto 2000 setup. Following Soundtraxx instructions to properly wire in a 680 ohm resistor I think used heat shrink to attach the cut down light tube and led lighting assembly as one piece. This helped to minimize any light leakage as well. Photo above shows the rear headlight and photo below shows the front headlight.
Additionally on the front headlight I used black electrical tape to minimize any light leakage that could occur around the numberboards or cab windows.


TSU-1000 DECODER & CURRENTKEEPER
Once the decoder was hooked up to the rail pickups, motor, and currentkeeper and test was performed to ensure everything was in working order. The Currentkeeper comes with instructions for installation into the numerous different Soundtraxx decoders, be sure to read these directions to know where and when you need to install this item.
As you work through the decoder installation process try to keep your wiring in order and not let it get to tangled or jumbled up. You will be happy you did this when you are wrapping up and putting the shell back on. Depending on how the wire was orientated some of the solder joints were end to end while with a piece of shrink tube slide over or the ends paired side by side, twisted, soldered together, and covered with shink tube. Note: Just like in the instructions - tinning your wires makes the process work much more efficient. I would say "faster" but this is not a race and quality is key for a successful install.

Bundling & Shell Re-install
Once all of you connections are complete its time to make a final test to ensure the motor is still working but also the lighting and sound operate. If all of these items test out fine, then its time to bundle your wires together and tape down to avoid anything getting into the gear tower or drive train. This part can be tricky making sure all of the wires get up in the shell and not stuck on the sides so take your time.


Enjoy
You just spent upwards of 2-3 hours completing this quality - now it is time to enjoy your work. Ring up the power desk and advise another motor is back in the pool awaiting assignment.
 MCIS 3833 idling at Bay Yard after being setout off the M-MCBA-27 which picked the unit up at Mt. Pleasant last night. 

Soundtraxx and Railmaster Hobbies both have great products and when combined together as done with these two EMD GP38-2 installs it is a win for the modeler!

Thanks for stopping by - stay tuned as we go into July..... videos as promised in my Early June Update hopefully should begin to materialize.

GM


Wednesday, June 24, 2015

Saturday, June 20, 2015

Foreign Model RR Equipment - Part 1

Taking a break from my Proto 2000 GP38-2s Tsunami sound install, we are going to touch on a neat subject that really happened more by coincidence this evening.

As a Proto freelance model railroader one of my primary objectives is the placement of my fictional class II regional into the modern day North American rail system. Plausible placement allows my railroad to do it's intended to purpose; Moving freight as a common carrier. Having the opportunity to be friends with other modelers who share this vision allows for paper interchanges between layouts and also the opportunity to share equipment with each other. More on the MCIS network and its role in a future post but onto the meat of the post.

The conincidence happened to be finding a few foreign model RR cars blocked together at Bay Yard.


Walking the yard I captured three 50' double door boxcars decorated for SRV (Saginaw River Valley Railroad) and VMID (Virginia Midland Railroad). These cars are empty awaiting the next M-BAMC that will take them north to Mackinaw City and across the straits for loading at the Superior PlyCo OSB plant. 

Saginaw River Valley Railroad - SRV


Two double door SRV boxcars showing off the large and small logo variations of their corporate scheme. These cars were recently shopped and repainted at Fogelsinger Rail Services, but it will not take long for the elements to give them a nice layer of grime and dirt dulling the shine. It is 2015 so reflective tape is a given.

These cars are in building product service  most notably hauling OSB, plywood, and other sheet type materials. While the MCIS does not interchange physically with SRV, these cars come to and from via the Y-BA05 transfer job to the Huron Eastern which in turn hands off to the SRV for delivery to the building supply company at Buena Vista, MI. Depending on demand for product out of Superior PlyCo the MCIS on occasion short term lease these cars to supplement customer demand.

Railcar instructions showing return to Saginaw Yard when empty.

The real SRV is a modular model rairoad club in Mid-Michigan that one of my fellow friends who paints MCIS equipment for me belongs to. Their website is provided below. As a kid I remember seeing their modular setup at the Tawas Railroad Days. A unique item was their setup featuring custom painted Michigan railroads that in the 90s you would never find in hobby shops. Never imagined some 20+ years later I would have two of their cars on my layout and have a great friendship with Fred Fogelsinger who has provided 20+ engines and 40+ cars painted for my Michigan Interstate. Remember those custom paints on the modular layout from the 90s I mentioned, those were done by Fred I just hadn't met him yet.

http://srvmodelrailroad.org/index.html


Virginia Midland Railroad - VMID

The other car we are going to talk about is this Virginia Midland double door boxcar. Once loaded at Superior PlyCo it will head back south on a M-MCBA connecting here in Bay Yard to the M-BAPH. At Port Huron the car will hand off to the CN who will haul it to NS Bellevue via Flat Rock, MI. Once off to the NS it will lastly interchange at Orange, VA.to the VMID for delivery on home rails to a building products wholesaler. The Virginia Midland is the railroad concept of good friend Shannon Crabtree. His modeling skills are fantastic along with some great weathering and custom painting work he has completed for me over the past few years. You can find a link to Shannon's VMID blog in my web links if you view this post in the website format. For those in mobile versions, just copy the address into your browser:

http://virginiamidlandrr.blogspot.com/

We have covered two railroads this post, future posts will cover more foreign model railroads that ply the Michigan Interstate St. Clair Sub. Just as foreign equipment operate here, so to does MCIS cars also roam beyond the walls of my home.

Have a great week

GM


Wednesday, June 17, 2015

Wordless Wednesday #19

Used with permission from Chris Palmieri.

Sunday, June 14, 2015

Dean Ferris' Oregon Joint Line

Yesterday I had the opportunity to participate in an operating session with ten others on Dean Ferris' N Scale Oregon Joint Line. The layout is north of Fort Worth and located in a large room above his garage which gives him the ability to have a 28' x 25' setup along with a dispatcher office. One thing I enjoy when visiting another layout is seeing first hand how the layout owner makes use of their available space to create their model railroad. Dean has done a fantastic job on the layout with the room providing a very comfortable atmosphere to operate in, which in this case was a little over 3.5 hours.

Lets run through some quick stats on the layout and then get into my assignments and some pictures from along the right of way.

Railroad: Oregon Joint Line (Proto-Freelance)
Size: 28' x 25'
Scale: N Scale
Era: 1969
Locale: Oregon Trunk Theme
Control: NCE Radio Throttles
Train Management: Track Warrant Control
Car Forwarding: Cartabs
Timetable to help with photos below - Ukiah is northern end and Humboldt Jct. is southern end

So being this was my first time to visit Dean's layout I marked up on the road pool board and began my tour of duty on the Oregon Joint Line northend and awaited my first assignment. Being this was a high priority train and one of the first out this session my first trip over the line was pretty straight forward having mainline the entire route.

1st Assignment - Hotshot Pig / Reefer Train
NP #611 Seattle to Los Angeles Super P
Power: 2 ATSF GP30s
Train Card with consist #, Lead Unit, Work Description
Southbound out of Lonerock along the river heading towards Fossil - the motors were getting their workout working up out of the river valley.
After cresting the summit at Snowline my train heads downgrade towards the town of Emigrant.
My two GP30s with a Boeing Skybox in tow ahead of the Pigs just north of Emigrant.
Good handling was required on this trip with officers and customers in tow on the rear end of #611 at Harney (Humboldt Jct.).

2nd Assignment - Coal Drag
DRGW to Centralia, WA Coal Train
Power: 2 DRGW GP30s with 1 WP GP9 sandwiched in the middle

I hadn't been off duty too long when the crew caller gave the next assignment to take a coal drag northbound from Humboldt Jct. to GN Jct. This train was pretty long with 24 loads and getting north out of Silvies would require helper assistance getting up and over the summit at Snowline. 

NP Coal Drag heading north into Silvies. Once on the north end of the yard a helper would cut in 5 cars from the rear to help make it over the summit at Snowline. With our helper, caboose, 24 cars, and 3 motors we barely fit into the siding at Snowline.

 Close up of DRGW 3006 - EMD GP30 leading the coal drag.

Nearing the end of our journey we see the coal drag along the river valley dwarfed by canyons on either side.

Third Assignment - Heavy Manifest Drag
NP #655 Pasco to WP Stockton 
Power: 2 WP GP40s and 1 NP SD45

Call came in to take this heavy manifest drag southbound from Pasco. Along the way this train made a block swap at Monument Yard and a pickup only at Silvis before continuing on to Humboldt Jct. 
Alot of work to complete with this train - 2 pickups, 1 setout, and helper assistance getting to Snowline.

Grinding southbound up the river valley grade from Lonerock towards my first setout / pickup location at Monument Yard. Nothing like 2 EMD GP40s and 1 EMD SD45 giving solid tractive effort to keep this heavy manifest drag moving.

 Passing through the north end of Monument towards the yard past the large chip mill.

We are now coasting downgrade just shy of Emigrant.

River crossing just north of Emigrant showcasing my lead motor on this trip WP #3508.

Cant forget the EMD SD45 sandwiched in between - what a classy scheme. Crazy to think this being 1969 and even in 2015 the venerable EMD SD45 is still soldiering on as its original self or in countless rebuilds.

The operating session was fantastic on all accounts, and even provided some opportunities to benchmark best practices to utilize on my St. Clair Subdivision. I look forward to my next opportunity to operate here and while the yard would be a new challenge the scenery is immersive making the end to end assignments on the road pool very rewarding.

GM

Tuesday, June 9, 2015

Early June Update

June has been busy to say the least as we just welcomed our daughter into the world.... So with that being said not a lot has been completed on the layout in terms of projects, but we can talk about what's on the workbench right now slated for completion.

Recent trackwork now allows certain 6 axle power on the West leg of the Upper Huron wye. After finishing breakfast at Lacey's Place in the photo I was surprised to find MCIS #4059 (SD40-2M) lead on M-PBBA-09 at Upper Huron. Another item to note is the water tower the township just built. 

Projects
Proto 2000 GP38-2 sound install 
Units MCIS #3827, #3833
  -Soundtraxx TSU-1000 EMD 645 non-turbo
  - Railmaster DS1425-8 Speaker
  - Soundtraxx Currentkeeper
  (Future Layout How to #2) June
  
Bay Yard Background & Scenery
  - Sceniking Backdrop Kits
  - floral foam / Sculptamold for terrain
  - real dirt base material from Michigan
  (Future Layout How To #3) July
  
Lakes Building Products 
  - Complete building kitbash
  - Add finished pavement for industry
  - Detail scene
  (Future Industry Spotlight #01) August

A lot of great projects in the works which make for some great content on the blog which I hope will either inspire or help you the reader complete a similar project. 

Not wanting to leave you empty handed this post, here are few pictures from around the layout showcasing the Sceniking backdrops that I have installed. 

As I work projects in these areas the scenery will blend with backdrops but until then the backdrops help bring location and time to the pink foam layout... Maybe somewhere in there a video may surface on my YouTube channel showcasing a tour of the layout. My wife got me a tripod for my iPhone so feeling dangerous on the movie making for the blog.


East end of Saginaw River swing bridge looking upriver towards Bay City and Essexville which are around the right bend. 
Corn field along right of way between Gray's Lake and Gerhard. Eventually the Busch cornfields will blend in foreground with backdrop.
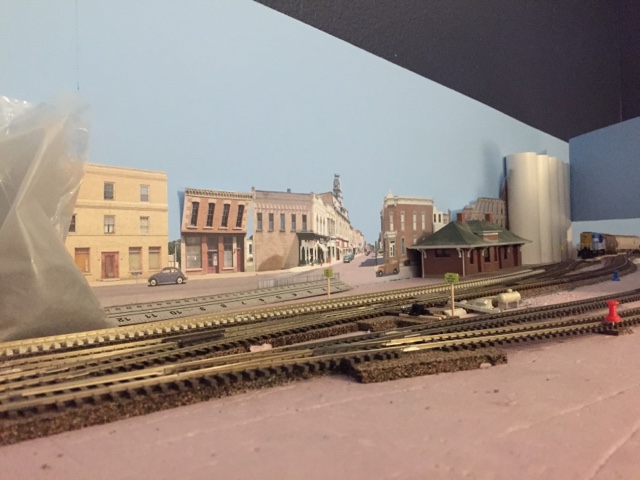
Looking down Main St. in Gerhard, the mainline continues off layout to the right and goes into East Staging. Still alot of work to get the right effect but off on the right foot.
Thanks for following my blog or just stoping through on your internet surf. If you don't subscribe or follow my blog, be sure to bookmark it as I try to post content throughout the month.

GM