Showing posts with label Inspiration. Show all posts

Saturday, December 27, 2025

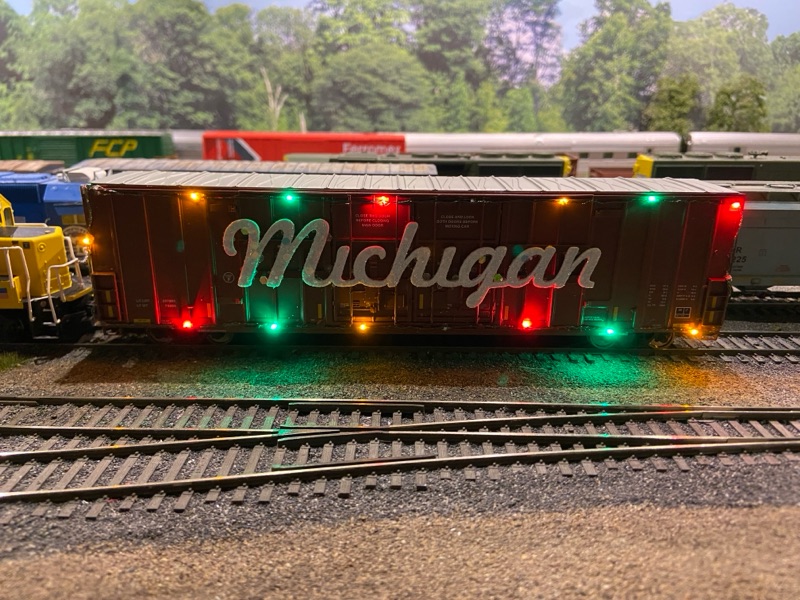
Creating Holiday Magic

Many of you have asked how I brought my MCIS Holiday Train to life, so we are going to spend this blog post doing exactly that! Quite a bit of content to cover which would not have done the process justice if just posting on Facebook.

MATERIAL & DESIGN

Matt Welke got the idea in my head while he was making those CPKC Holiday Train decals. Look no further than the prototype for inspiration in the form of 60’ Plate F boxcars. The specific boxcars used by CP are not made and that’s ok as the car type was really just inspiration.
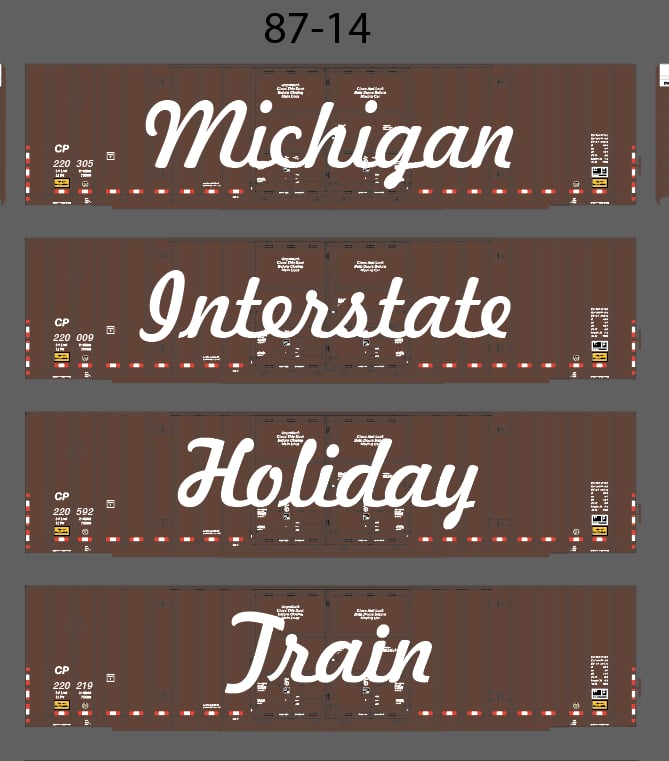
What was available were Walthers Mainline 60’ double door boxcars with the GTW/CN version very sparse marked (Only reporting marks). Made an order for (4) from the good folks at Midwest Model Railroad and they arrived before I knew it.

Alongside the railcars, I need the actual signage which was cut by Circus City Decals from very thin styrene. Topping off the material and design was the 26 led flashing kit from Evan’s Designs.
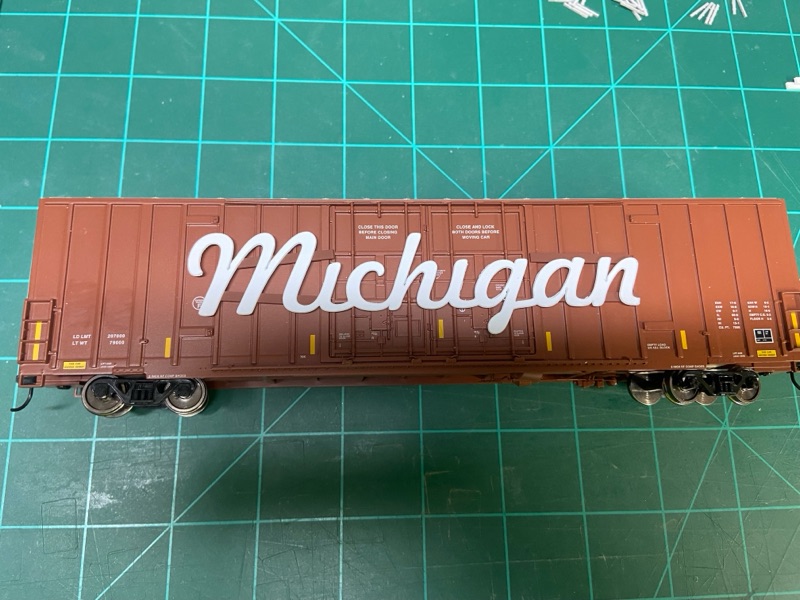
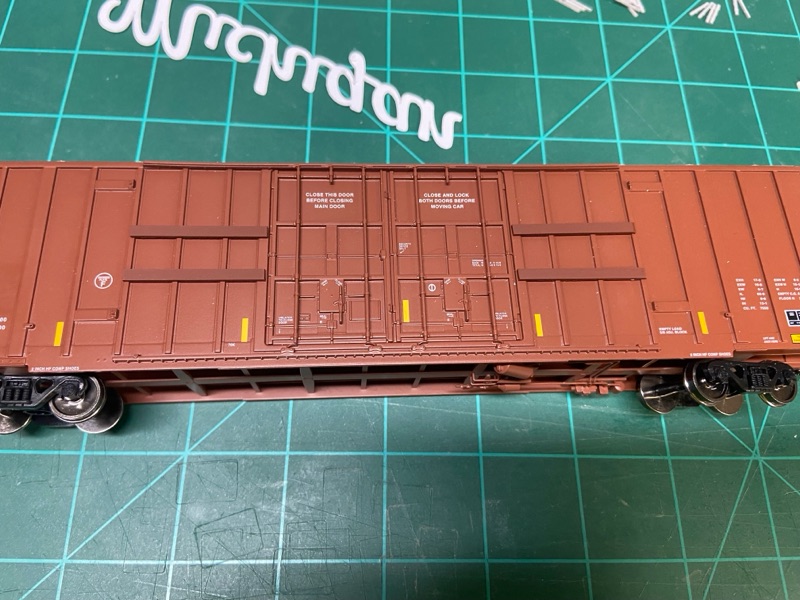
With railcar and signage on hand I mocked up the layout using the artwork Matt provided. The goal was not to heavily modify the cars but keep it since I had to add lighting still. Getting the lettering even with the door rods was accomplished with (4) styrene strips that I cut, painted, and installed.
Material Listing

(4) Walthers Mainline 60' Double Door Boxcars

(4) Evans Designs - 26 nano LED flashing multi-color light kit / 3V 

    Mini Colored String Lights | Shop for Mini Multi-Colored Lights

(1) Styrene to level out signage

(1) Set of custom cut signage from Circus City Decals + Decals for new reporting marks 

(1) CA glue + Accelerator

(1) Spray Adhesive

(1) Paints to match / your choice 

(1) Glitter of your choice 

(12) AAA batteries 

INSTALLATION

Before I spent a bit of money ($35 per light kit x 4 railcars) I figured it would be wise to complete installation on MCIS7401 "MICHIGAN". If everything worked out well on this car, it would just be a matter of applying to the rest of the boxcars. Since I am writing this blog post, we can rest assured that it all worked out just fine. Please mind the photos I forgot to take them during the first railcar so what you will see if the concept that applied to all installations. 


Install Item 1 (Styrene Support) - Depending on the length of the signage determined the length of the styrene strips that were used to level out everything. What I did ensure no matter the length was the strips spanned from the door frame out either the first, second, or third rib providing a solid support. These were painted to match the railcar before installation. 

Install Item 2 (Paint / Glitter the Signage) - Just like it sounds each sign after removing from cutout had a bit of clean up sanding, then got a white base coat and after this dried were sprayed with Elmers adhesive and covered in a snowflake glitter. This glitter helps reflect the light from the leds around the car. 

Install Items 3 (Install the new decals) - which for these cars were just reporting marks and numbers

Install Item 4 (Conduit clearance) - while the battery, switch, and controller are located inside the boxcar, I needed a way to get the wire to the outside. On each car in the upper left corner I notched out a very small portion of the eave where the wire threads through to begin the lighting around the carbody. 

Install Item 5 (Railcar Signage) - I went ahead and installed all of the interior signage with the LEDs being added last around the perimeter. 


Install Item 6 (LED Install) - With the interior items and conduit path made I installed the LEDs from the upper left corner (clockwise) around the car. For this I use gel type CA applied using a toothpick and CA accelerator to quickly lock in the LED before moving to the next one. The LED kit I used operates independent of track power, be sure to test out before install to ensure everything is working properly. 


Take your time working around the car, but once you do the first car and figure out where to best install the lights and wiring the next cars will go quicker. Given its a 26 light string on this car you will find extras left over. I use the conduit patch and tuck the rest inside the railcar which is then secure with kapton tape out of the way. 

After installing all of the lights come the fun part of testing and operating your railcars. I will share how the train was operated along with its train consist in the next post. 

Until then happy modeling! 

GM


Monday, October 30, 2017

Modeling Glass Cullet Loads

I think at one point we all come across a prototype freight load that begs to be modeled. In particular I can say there are many that lack a model, but a simple one that has been on my planning board for sometime is recycled glass otherwise known as "cullet". My intended goal will be to share the backstory and creation process so you can bring these loads to your layout. 


What is it? 
In simple enough terms it is crushed recycled glass. This material is used in numerous ways such as fiberglass insulation, glass beads (sandblasting), and road materials to name a few. 


           Potter's Industries north of Brownwood, TX. They make glass ball beads for many different uses. 
                   Photo courtesy of Google Maps. 

How is it transported?
Alot of times glass cullet is crushed and transported locally by truck from the recycling facility to end user, but there are cases where it moves by rail. I do not believe it will be one of those unit train type commodities found often like aggregate or coal, but as a one off load. Every prototype example I have seen or found shows use of dump trucks or open top hoppers, not to say an older covered hopper could be utilized. This is a heavier material as its raw material was sand and soda ash prior to becoming glass, so the car would not be loaded to the brim more around 3/4 full. The cars I have seen are marked EAMX (Everest Railcar Services). Due to the nature of the commodity these are probably in a captive service as cleaning would require something more abrasive then water like sandblasting. 

Besides seeing in person from an overpass, John Danielson over at rrpicturearchives.net has the best photo of these 3 bay hoppers carrying glass cullet at this link: EAMX 328 - John Danielson Collection 

How is is loaded/unloaded?
Loading at the crushing facility is as simple as a front end loader filling its bucket and dumping into the railcar. Unloading is just as easy. In this prototype example a small under track pit allows the transloader to empty from one gate at a time. The pit is shallow but deep enough for a front end loader to get a bucket full, back up, and then load the awaiting truck. The front end loader could also double as a car mover if multiple cars are to be unloaded. 


Photo courtesy Google Maps (Satellite View)
                         Glass cullet rail to truck transload in Brownwood, TX on Texas Rock Crusher Railroad

                                                        Photo courtesy Google Street View 

How is it modeled?
The easiest part about glass cullet is its "replication" on a model level. Sometimes making model loads are complex and require kitbashing or even scratchbuilding. In this case it is about simple cosmetics. Follow along as I walk you through creating a glass cullet load. In as little as a weekend you could have yours complete. 

Step 1: Materials
- Removable type open top hopper load (I used Motrak Models #81728)
       ** Side note the Motrak Models coal load is fantastic as purchased without changes **
- Rustoleum 2x (Gloss White) or any cheap white spray can 
- Dullcote
- Extra fine glitter (I used silver peacock which is blueish-green-silver)
- India Ink / Isopropyl Alcohol mix


Coal type loads work well with the sharp angles to provide a good texture for the paint / glitter to adhere on. 

Step 2: Base 
- Start by giving the drop in loads a generous coat of gloss white (Well ventilated area)
- Spray from all four angles to ensure you get a good coat in all the tight spots


Step 3: Glitter
- Giving the paint just about one minute to setup some then sprinkler your glitter
- Do not worry about being modest you want solid coverage 
- At this point let the load completely dry, do not touch or dump off excess glitter


Step 4: Glitter to Cullet
- Once dry, carefully pickup the load and tip it over to remove excess material.
- You should have good coverage with no load under showing through.
- In a well ventialiated area - spray the load with dull coat and let dry.
- The glitter provides the dull shine that you would find from crushed glass.  


                           This was my test plastic load before making the cullet loads from Motrak load. 

Step 5: Dull 
- Once dullcoat is dry use your fingernail to check around the edges of the load and remove any glitter stuck on the sides. Its important the sides are clear of glitter so it will sit properly in the railcar. 
- Airbrush load with a india ink / alcohol mix to get the desired dirty effect 
- Let dry, then place in railcar.


This technique worked well for plastic and hydrocal casting loads. Materials can be purchased for under $10 at your local craft store. 


I hope you enjoyed this fun post, showing you a quick and inexpensive way to add a one of a kind open top load to your layout. Everyone have a safe and happy Halloween.

GM 


Monday, June 5, 2017

May Recap

Sometimes even the best intentions of publishing a blog post monthly does not go as planned. The month of May was by far the busiest for me in terms of traveling in 2017 for both work and pleasure. June is well underway and with that will come great content on the layout and MAC Rail but this post we are going to recap the on-goings during the month of May. 

Grays Lake Update
One goal I had for the layout was taking my time and really building character into each scene. My current focus is the Town of Grays Lake. The middle of May ended up being the largest push to "Pave" the scene and "Bring Light" to things.... Sorry for the puns, could not resist. Well the answer is in the words, as I ended up getting the pavement, pavement markings, and lighting added into the scene.

 Looking east down First Ave. 

 Overhead view of First's parking spots, sidewalks, lights, and weathering

Looking north on Main St.

So far in downtown Grays Lake I have installed 9 street lights with an additional 5 of this ornate design required. Additionally a few wooden lamp posts will be installed at the fertilizer plant, track access road, and side street. The Woodland Scenics Just Plug system makes this process very easy to install and just takes minute to connect and lighting. I believe you would agree with the following photos that the finished result is amazing.

 Overview of entire modeled downtown

 Corner of Main and First. 

View north on Main St. 

Additional work on Grays Lake included the addition of Railroad St. which runs between First and Second Avenues. The road runs parallel to the Michigan Interstate St. Clair Sub mainline. Along Railroad St. is Dean's Garage which is a small town auto repair shop. Pretty sure the scene will have the owner Dean sitting out front with cold suds watching trains versus fixing autos...

Deans Garage located beside Railroad St. The shop will actually be located on Second Ave.(Cork).

In the month of June you can expect to see further progress on Second Avenue and getting scenery such as shrubs and trees more permanently in place. Additional lighting will be added as purchased. I will cover the entire install and wiring process for these lights in a future summer post.

Quick word on the streets and sidewalks - they are styrene and created following Lance Mindheim's Road How To on his blog. Basically rustoleum gray for the aged asphalt and india ink / alcohol airbrushed following his technique. Prior to weathering I did use Summit Custom Cuts road marking decals which I must say were easy to use and turned out great. Lastly the sidewalks are laser cut wood from Minuteman Scale Models. They offer different angles and the detail is perfect for further detailing and weathering. 

Travels - East
Early in the month of May our family traveled to Walt Disney World. Anyone who has followed my blog for sometime knows I try to provide a few pictures and recap on the love of railroading that Walt Disney had. To this day trains play a large part in the parks. Here are a few photos. 

 Main Street Station at The Magic Kingdom

 Garden Railroad at Epcot's Germany Pavilion - versus the past they had trains running with mutliple car consists. This is a nice change to just seeing a engine running light. 

Great view of creek, tunnels, and multiple loops on setup. There are four loops with two in the foreground, one in the upper right background, and another in upper left corner beyond the bridges. 


Travels - West
The back end of May require me to be in Southern California for a work conference so while traveling on my off time I did have a chance to stop in a Railmaster Hobbies in Bellflower, CA. and Arnie's Model Trains in Westminster, CA. My first reaction to both of these stores is wow what great staff, great customer service, and great selection to the modeler. Both stores had items that we do not always see in Texas. Lets take a look at both stores and run by what I picked up. 

Railmaster Hobbies - Bellflower, California
I prefer using Railmaster Speakers for my DCC sound installs and no better place to get them then the source! I picked up 2 of the DS1240-Box speakers, 4 DS1425-8 speakers, the American Model Builders Wind Blade 3 Pack, BLMA detail parts, and Athearn Genesis 89' flat. Funny story I actually bought everything and I got to talking with Dave at the store so i accidently left my detail parts behind. A week later after tearing apart my suitcase thinking I had misplaced them I gave em a call and they had set the 2 parts aside. Soon enough the parts were in the mail heading to Texas. 


Arnie's Model Trains - Westminster, CA
I had been to California back in 2012 and visited Milepost 38 ToyTrains when they were still in Anaheim Hills. Since then Milepost 38 and Arnie's have co-located side by side in the same shopping center. If you are looking for HO and N then you go into Arnie's. Looking for O and G scale step next door to Milepost 38. 


Great store, great staff, great selection. The modelers in Southern California are very fortunate to have two great stores that support the hobby and if one doesnt have the item you are looking for they suggest to check the other. Nothing against ordering from Walthers or OEM direct, but it is always nice to support local model train stores. Beings I spent quite a bit at Railmaster Hobbies, I opted to keep this trip light and picked up one of the new Athearn R-T-R 60' Gunderson TTX repaints in the TOBX marks. Additionally this car comes faded with patchwork. Thanks to James working that day for pointing this out. I saw the re-stenciled reporting marks but was unaware of the factory pre-fade. 


If you are in the Southern California area make time on your trip to stop by both of these shops, you will not be disappointed. Make sure to make room to bring home items in your checked bag as well. 

Wrapping up the trip was a quick trip to Disneyland. I couldn't miss out on having both Main Street Stations in the same post. 

Main Street Station at Disneyland Park

That wraps up my May recap. Pretty busy month of traveling but as you saw I got a little more done on the Grays Lake scene. Stayed tuned in June for two updates once showcasing the purchases from my California trip and MAC Rail projects. Later in the month we will head back to the layout to see progress at Grays Lake.

Have a great week.

GM 


Monday, April 10, 2017

Creating Freelance Realism (Branding & Schemes)


Thought I would take a break from my normal progress updates and switch gears to show the different ways you can create freelance realism in model railroading using branding and schemes. 

Brand Identity - consistent, plausible, and purpose

It all started with a logo...
As you know at the Walt Disney Company they say it all started with a Mouse.... Well the Michigan Interstate all started with a logo. I think all of us model railroaders can relate to that restaurant napkin chalked with ideas such as route map, track plan, diesel roster, and the logo. Oddly enough the Michigan Interstate's logo started on a scratch sheet of paper in my college advertising class. We had been discussing brands and how it should reflect what the company stands for / does... At the time I knew of the MR&T and V&O railroads and realized that if I was modeling a freelance railroad in Michigan it might be important to have an outline of the state. Taking inspiration from notably the Algoma Central logo I wanted to have a focal point symbol.... Case in point the pine tree in the middle of the state outline. Other inspiration came from the BRC Railroad logo being a belt. I knew the railroad being created would not be belt line but more or less be interstate. The two lines across the hearld represent those connections. Looking at Wisconsin Central as an example its core was Wisconsin, but had connecting lines in Michigan, Minnesota, and Illinois. With that the name Michigan Interstate was born, truly the purpose of the railroad is right in the name connecting Michigan within the state and neighboring connections in Ohio and Indiana. Leaning back to the Algoma Central logo, I decided to wrap the words in similar fashion. The font is based on Milwaukee Road's final font before being absorbed into the Soo. Honestly when I was working with Rail Graphics to create the logo I chose the font based on the flyer available, haven't looked back ever since.

Just like that the Michigan Interstate logo was born creating the base for the brand. Over the past 13+ years the logo and lettering have been applied to no less than 30 locomotives and 100 plus railcars. As more equipment became lettered the brand began to spread. No longer was the Michigan Interstate a scrappy railroad with patched equipment we now had a paint scheme creating a consistent image that was plausible in the railroad world and had a purpose. 

The best part about setting up ones logo is the business or individual can provide a copy of the logo in different formats once computerized for use on paperwork or even embroidering.

Crew members can work in style during home or away ops sessions carrying the brand anywhere they are.

The MCIS logo is now found on every official piece of railroad paperwork... corporate folks.....

In a nutshell that is how the Michigan Interstate logo and name came to be. Where we operated and what we do are another topic that we will discuss later this year. 

Defining the Dip...
Getting back to branding, the railroad now had a logo and just as important was the creation of a plausible scheme to apply it on. Going back to my childhood I grew up loving the Grand Trunk Westerns blue and orange scheme. I even loved the different variations such as former DT&I and UP locomotives using the GT basic scheme. Early on I really wanted to use the Central Vermonts Yellow and Green scheme that was on diesels prior to NECR takeover, but decided on taking two of the best and putting them together. Blue from the GTW engines and Yellow from the CV engines. 


Courtesy www.wig-wag-trains.com

Phase I
Early on in the railroads history first generation diesels and alcos received a Grand Trunk Blue color with white chevron nose and rear. Not sure where the yellow was but maybe they had to watch the budget... Not exactly the scheme I had intended and throughout the years as engines were either struck from the roster or repainted the Phase I scheme all but vanished. The last four engines on the MCIS roster in Phase I scheme are EMD GP30s currently stored at Mt. Pleasant MAC Shop. As these engines go through a rebuilt to roadmate slugs they will be repainted into the current Phase III paint scheme.

MCIS 3080 (EMD GP30) posing at Saginaw River Bridge in Phase I scheme - the color has held up well...

Phase II and III
Adopting the Grand Trunk / Central Vermont inspired schemes, all second generation and new deliveries come in the Phase III scheme. You ask, but wait you forgot about Phase II? The only difference in Phase II and III is the choice in color for the Blue. Originally the blue was a Floquil Enamel GT Blue, as this phased out we migrated to Conrail Blue. When Floquil went away the mechanical team turned to Scalecoat for paint sourcing which is where we established Phase III. Additionally Phase III engines had their rear number boards covered over as another unique spotting feature. The elements make distinguishing between the two colors almost impossible, but this adds a neat layer of story telling since each engine unless painted in the same patch is not identical in color.

MCIS 3827 (EMD GP38-2) posing at Saginaw River Bridge in Phase III scheme. 

Phase IV
There have been rumors of a Phase IV which would adopt a more simplified paint scheme similar to the repainted dark blue FEC geeps. However at the time of this writing, there is no official plans to change schemes. 


Railcars

Using multiple sources of freight cars plying the North American system I had plenty of inspiration to follow. 

Boxcars fell into one of two basic schemes which used a very generic freight car brown as the color. Scheme "BA" was large or small logo on either end of railcar, while scheme "BB" was large or small logo on right hand side of door witch "Michigan Interstate" spelled out in large or small font to the left of the door. 

 Examples of both scheme "A" and "B" at Bay City, Michigan


Shoving platforms used the Grand Trunk Orange with MCIS logo centered on car.

MCIS 31 leading point on switching duties at Bay City, Michigan. 


Company material cars are like most railroads being cascaded down from revenue fleets. However some of the more purpose built ballast and dump equipment are painted in the Amtrak orange scheme with full lettering on sides, no logo. 

MCIS 7059 captured at Grays Lake, Michigan during a recent track work project. 


The largest fleet on the roster is covered hoppers of different capacities. The hopper fleets also had three different gray paint schemes based on the vendor / batch, additionally there were two basic schemes for lettering. Scheme "CA" was logo large or small on right hand side or centered on railcar. Scheme "CB" was logo on left side of car with lettering in large or small font on right side.

Top two hoppers in scheme "CA" and bottom car in scheme "CB"

Rounding out the freight car fleet is our open top fleet which falls under one of two schemes. Scheme "HA" which is Michigan Interstate in small font with a logo to the right or scheme "HB" which is large or small logo only on left, right, or center of car. 

Two greenville hoppers in scheme "HA" on Virginia Midland Railroad

Within all of these fleets are plenty of variation like patch jobs or different colors, but the point is with the logo and brand there is consistency between the T-shirts, paperwork, and equipment. The consistency helps better establish your railroads purpose and plausibility in the era you are trying to model. Sure I could model the 90s but every piece of equipment in these photos has FRA 224 reflective striping making it very clear this is post 2012. 


So there you have it branding and schemes of the Michigan Interstate. The consistency, plausibility, and purpose have helped define three important questions:
  • Where does my railroad operate 
    • (Michigan)
  • What / When is my railroad 
    • (Modern era - Regional)
  • What does it do 
    • (Hauls Agricultural, aggregate, and paper products to North American network) 
Have a great Easter Week!

GM